

Proving Basket for Sourdough Bread Baking
27-09-2025

A proving basket is one of the simplest yet most important tools in bread making. It is trusted by bakers worldwide for guiding dough through its final stage of fermentation, ensuring each loaf has the structure, flavor, and appearance that sets sourdough apart. The process of bread proving is where dough truly transforms, moving from a sticky mass to a well-formed shape ready for baking.
During proving, yeast and natural bacteria release gases that stretch the gluten network, creating the airy crumb and crusty exterior that define great sourdough. This stage is also when flavor deepens, aromas intensify, and the dough takes on the character that bakers value most. Without the right support, dough can spread out, lose height, or stick, leaving bread heavy or uneven. With the help of a proving basket, bakers achieve consistent results and the rustic flour pattern that has become a hallmark of artisan loaves.
At Bakerykart, we have seen how bakers elevate their skills by choosing reliable tools that make each stage of bread preparation more precise and enjoyable. A proving basket for sourdough bread baking offers durability, breathability, and ease of use, making it a favorite for both home enthusiasts and professional chefs. Its role is simple yet powerful, turning ordinary loaves into bakery-quality creations.
In this blog, we will explore how proving works, the different materials used in baskets, and our most popular models chosen by bakers across India. We will also share step-by-step usage tips, highlight essential tools that complement the process, and provide answers to common questions. By the end, you will see how investing in a quality proving basket not only improves your loaves but also enriches your entire baking experience.
The Science and Art of Bread Proving
Bread proving is one of the most fascinating stages of baking because it is here that dough truly comes alive. At its simplest, proving is the controlled rest period where yeast and natural bacteria feed on sugars in the flour, releasing carbon dioxide that inflates the gluten network. This is the science behind the airy structure and open crumb that define artisan sourdough. At the same time, organic acids and alcohols develop, building complex flavors that make the bread fragrant and satisfying.
Proving happens in two phases. The first is bulk fermentation, when the dough rests after mixing and shaping begins to take form. During this stage, the gluten develops elasticity and the dough gains strength. The second is the final proving, when the shaped loaf rests before baking. Here the dough relaxes, expands, and becomes ready for the oven. Both stages are equally important because skipping or rushing them can affect the rise, texture, and flavor of the finished bread.
Inside the dough, a series of transformations take place quietly but powerfully. Tiny bubbles of gas form and stretch the gluten, creating the airy crumb that bakers look for. Meanwhile, fermentation by-products deepen the taste, producing subtle sour notes, nutty undertones, and that signature aroma of fresh sourdough. These developments cannot be replicated by shortcuts. Proving demands patience, and it rewards bakers with loaves that have both visual appeal and memorable taste.
While the science of proving is universal, the way it is practiced can change the outcome dramatically. Temperature, hydration, and flour type all influence how quickly dough ferments. Skilled bakers learn to balance these factors and use tools such as a proving basket to ensure consistent results. The basket supports the dough during its final rise, maintaining shape and helping air circulate for an even fermentation. This is why proper proving is often seen as the dividing line between bread that looks homemade and bread that looks like it came from a professional bakery.
Materials Used in Proving Baskets
When choosing the right basket for fermentation, material matters as much as size or shape. Different materials create different results, and each comes with its own benefits. Below are the most common proving basket materials and why bakers select them.
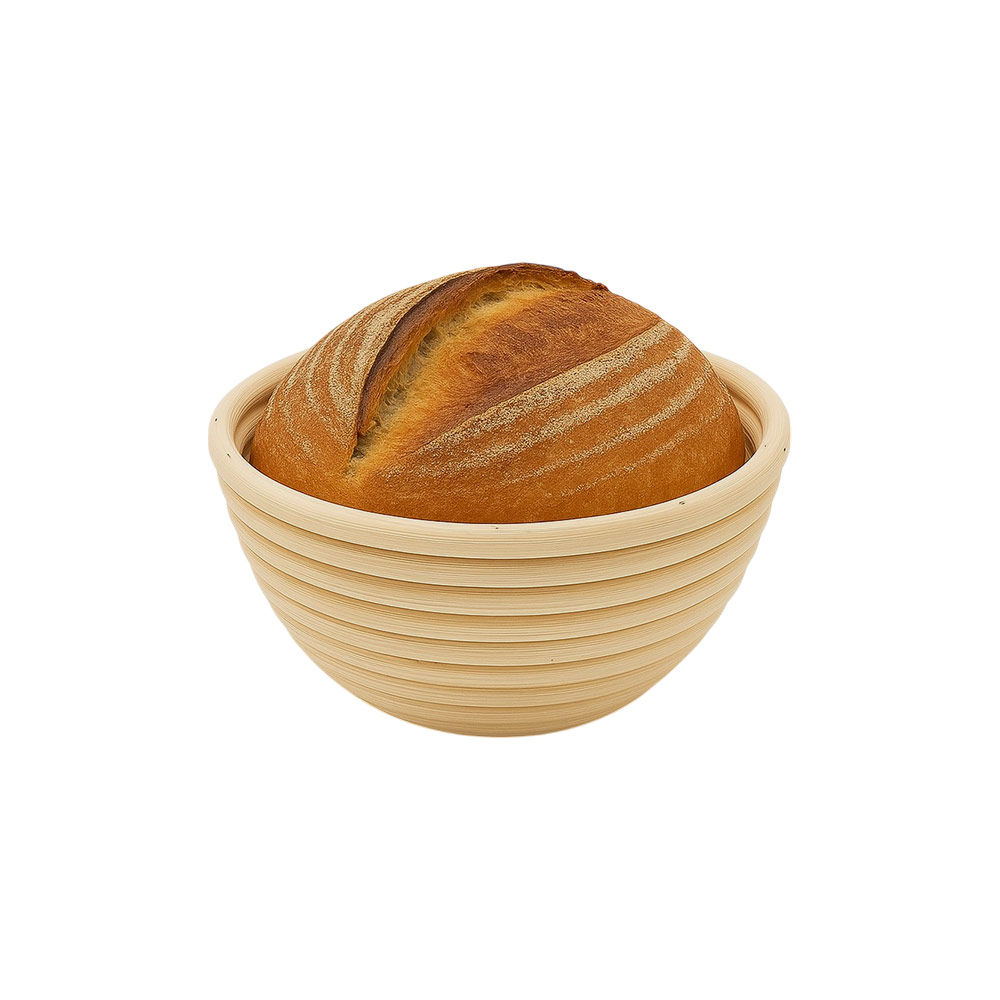
- Banneton (Cane or Rattan):
Banneton baskets are the professional’s favorite. The natural cane surface gently wicks away excess moisture, preventing sticky dough and creating a dry skin that bakes into a crisp crust. They also imprint the signature spiral pattern seen in artisan loaves. Durable, breathable, and reliable, bannetons are the gold standard for both home and bakery use. - Cloth-Lined Baskets:
Cloth-lined baskets are ideal for high-hydration doughs that can stick easily. The cloth barrier makes it simple to release the dough while leaving behind a smoother finish rather than spiral rings. Many bakers keep one on hand for recipes requiring extra hydration, as the cloth provides both convenience and flexibility in everyday sourdough baking. - Plastic Baskets:
Plastic options are popular for their affordability and easy cleaning. They are lightweight and practical for beginners, but they lack the breathability of natural cane. Because plastic does not absorb moisture, dough can remain slightly sticky, making shaping or scoring trickier. While not a top choice for professionals, they are functional for casual or experimental baking. - Silicone Baskets:
Silicone baskets are flexible, non-stick, and simple to maintain, which makes them appealing to some bakers. However, they do not provide the rustic look or crust quality that cane baskets deliver. The non-porous surface retains moisture, resulting in loaves that feel softer on the outside. These are more about convenience than tradition and are rarely used by artisan bakers.
Among these choices, the proving basket made from natural rattan continues to be the most trusted by chefs and serious home bakers. Its ability to manage dough moisture and create artisan patterns makes it the benchmark for professional-quality sourdough.
Top-Selling Proving Baskets at Bakerykart
At Bakerykart, we curate proving baskets that meet the needs of both home bakers and professionals. Each basket is designed to support even fermentation, maintain dough shape, and deliver that beautiful artisan finish. Over time, a quality banneton basket becomes more than a tool, it becomes part of your baking routine. Here are our top-selling baskets, each trusted by bakers for its performance, durability, and ability to create consistently impressive loaves.
-
15 cms Round Banneton Basket
This small banneton is ideal for compact loaves and single-serve sourdough boules. Bakers prefer it for trial batches and everyday practice since it provides the same fermentation benefits as larger baskets while being easy to handle. Its rounded design helps dough rise evenly and creates the signature spiral pattern of artisan bread, even in smaller loaves.
-

18 cms Round Banneton Basket
The 18 cm banneton is the perfect mid-size option, preferred by bakers who want versatility in sourdough baking. It allows dough to rise steadily, developing both volume and flavor. This basket is often chosen for loaves meant to serve two to three people, making it practical for families while still producing an artisanal finish that looks bakery-ready.
-

20 cms - Oval Banneton Proofing Basket
This oval proving basket is a favorite among bakers preparing rustic batards. Its elongated shape supports dough during fermentation, preventing collapse and encouraging even oven spring. The natural rattan wicks away excess moisture, ensuring a crisp crust with every bake. Bakers choose this size when they want loaves that balance visual appeal with reliable structure and flavor.
-

20 cms - Round Bread Proofing Basket
This round bread proving basket is a best-selling size for traditional sourdough boules. Bakers appreciate it for its consistency, as it works well with a wide range of recipes. The basket provides excellent fermentation support, creating an open crumb and rustic spiral flour rings. It is the go-to choice for those who bake regularly and value reliable results.
-

22 cms - Oval Banneton Proofing Basket
The 22 cm oval basket is designed for larger sourdough batards, making it popular for family-sized loaves. Its sturdy rattan frame supports dough expansion, ensuring it holds shape through fermentation. Bakers choose this basket when they want impressive presentation loaves with a tall rise, airy crumb, and an oval silhouette that looks beautiful on the table.
-

25 cms - Oval Bread Proofing Basket
This 25 cm oval proving basket is perfect for bakers who enjoy making larger loaves. Its capacity allows dough to expand fully, producing bread that serves a group with ease. Favored by serious enthusiasts and professionals, it combines durability with practicality, giving loaves a rustic character, crisp crust, and consistent quality that elevates every baking session.
Every proving basket in our collection has been selected for its ability to deliver consistent performance and artisanal quality. Whether you are experimenting with small boules or preparing loaves to share with family and friends, these baskets make the process easier and the results more rewarding. By choosing from our top-sellers, you are investing in tools trusted by bakers across India to bring out the very best in sourdough baking.
How to Use a Proving Basket Step by Step?
Using a proving basket may feel intimidating at first, but it is surprisingly simple once you learn the rhythm. The basket does not just hold dough, it helps create the structure and look that bakers admire in sourdough bread. Preparing it properly ensures your dough rises evenly, develops its flavor, and unmolds beautifully when ready to bake. The following step-by-step process will help you get consistent results and bring out the full potential of your sourdough baking.
- Step 1: Prepare the Basket
Dust the inside of your basket with a light coating of flour, or use a cloth liner. This prevents sticking and encourages a clean release later. Flour also leaves the distinctive artisan pattern on the loaf, a mark of authentic craftsmanship. - Step 2: Shape the Dough
Once bulk fermentation is complete, shape the dough into a boule or batard. Proper shaping strengthens the gluten and creates surface tension, which helps the loaf expand evenly during final proving and baking. - Step 3: Place the Dough in the Basket
Transfer the shaped dough gently into the basket, seam side up. This allows the dough to expand naturally while proving. The basket’s structure supports the loaf and prevents it from spreading out flat. - Step 4: Cover and Let It Prove
Cover the basket with a clean cloth or wrap to prevent drying. Let the dough rest until it doubles in size. Temperature and time vary, but patience ensures the dough develops its best texture and flavor. - Step 5: Unmold the Dough for Baking
Turn the basket gently onto a baking sheet or peel. Lift carefully to reveal the spiral pattern or smooth finish. At this stage, the dough is ready for scoring and baking.
These simple steps transform the proving stage into a reliable and rewarding routine. With practice, preparing and using a basket becomes second nature, making sourdough baking less stressful and more enjoyable. The combination of structure, support, and signature patterns sets the basket apart from ordinary containers, turning each bake into a loaf that looks and tastes like it came from a professional bakery.
Essential Tools for Bread Proving
A proving basket is at the heart of sourdough baking, but pairing it with the right tools makes the process smoother and more rewarding. These tools are designed to handle sticky dough, score with precision, and manage ingredients with ease. Each has its own role in ensuring that your loaves look beautiful and taste exceptional. At Bakerykart, we bring together professional-grade accessories that help bakers achieve consistent results. Below are some of our most trusted essentials.
-
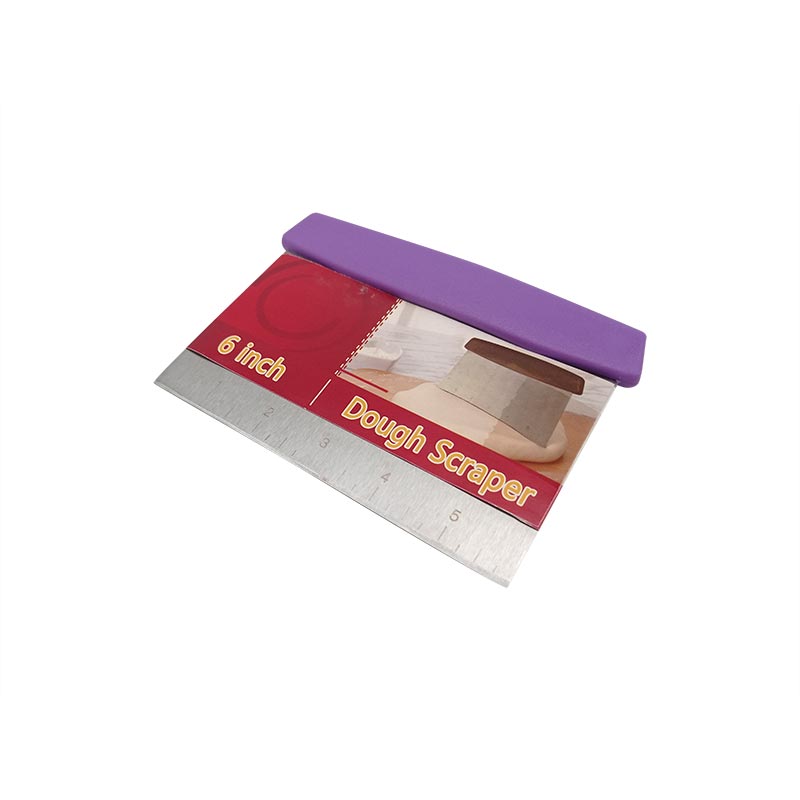
6 inch Stainless Steel Dough Scraper
This scraper is a must-have for handling sticky dough and keeping your workspace clean. It helps cut, divide, and lift dough without disturbing fermentation. Bakers prefer it because it reduces waste and maintains precision during shaping. Durable and easy to grip, it is an essential companion to your proving basket.
-
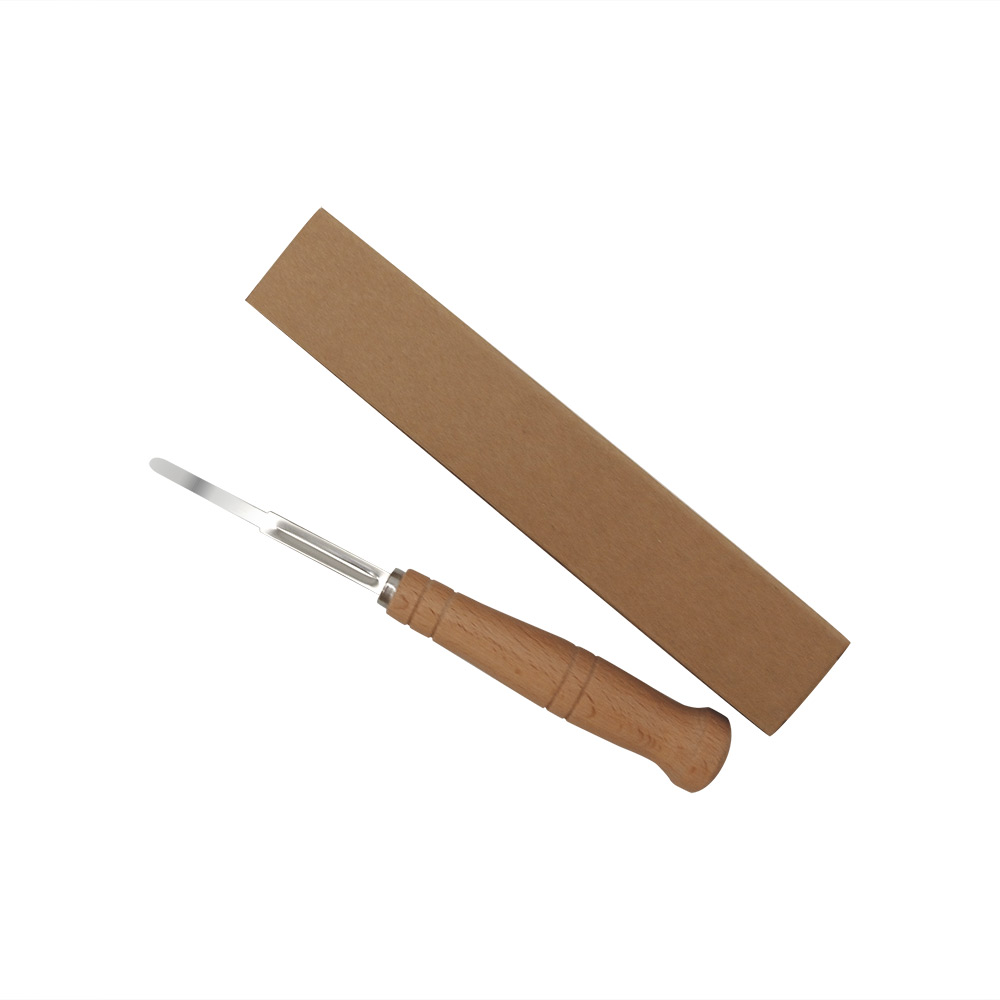
Artisan Bread Lame
A bread lame is essential for scoring dough before baking. This tool allows you to guide oven spring and create decorative patterns. Bakers value it for the control it provides, ensuring that sourdough opens naturally in the oven. The wooden handle offers comfort while the blade delivers clean, precise cuts every time.
-
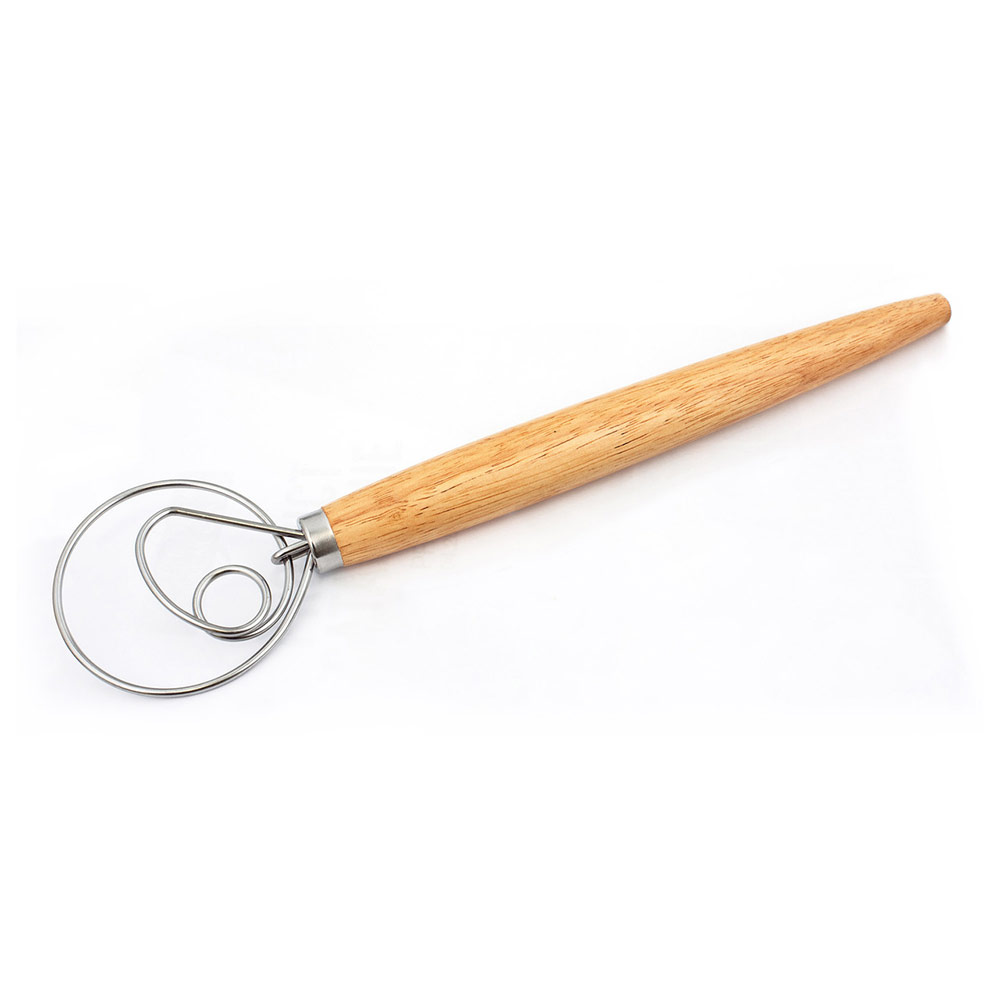
Danish Dough Whisk
The Danish Dough Whisk is perfect for mixing sourdough, thick batters, or starter without overworking gluten. Its sturdy wire design cuts through dough easily, reducing clumps and making preparation faster, cleaner, and more efficient than standard spoons or spatulas.
-

Silicone Spatula with Steel Core
This silicone spatula is perfect for preparing and maintaining sourdough starter. It easily scrapes jars and bowls clean, ensuring no starter is wasted. The steel core provides strength while the silicone keeps it flexible. Bakers love how it simplifies mixing, feeding, and transferring starter, making it an indispensable tool alongside proving baskets.
These tools may look simple, but they each play a vital role in the sourdough process. From managing dough to scoring and mixing starters, they work seamlessly with proving baskets to deliver professional results at home. By choosing durable, thoughtfully designed accessories, you set yourself up for success and elevate every bake from routine to exceptional.
FAQs on Proving Baskets
Even experienced bakers often have questions about how to use, maintain, and get the most from their baskets. Bread proving is a delicate process, and the right knowledge makes it easier to avoid mistakes and build confidence. To help, we have compiled answers to the most common queries we receive from our community of bakers. These practical insights will guide you toward consistent results and ensure your proving basket lasts for years to come.
- How long should dough prove in a basket?
The proving time depends on dough hydration, flour type, and room temperature. On average, sourdough requires between two to four hours at room temperature for the final rise. Some bakers prefer refrigerating overnight for slow fermentation, which deepens flavor and strengthens structure. Always rely on the dough’s look and feel rather than the clock for the best results. - Can I put a proving basket in the fridge?
Yes, baskets can be placed in the refrigerator during cold fermentation. This method slows yeast activity, allowing dough to develop a more complex flavor profile. If you refrigerate, cover the dough with a clean cloth or wrap to prevent drying. Ensure the basket is dusted well with flour beforehand so the dough releases smoothly after the cold rest. - What flour is best for dusting a basket?
Many bakers use rice flour because it is less likely to absorb moisture and stick to dough. Others mix rice flour with all-purpose flour for balance. The goal is to create a light coating that keeps dough from clinging to the basket surface. Avoid over-flouring, as this can leave visible streaks on your baked loaf. - Do proving baskets only work for sourdough?
While they are most associated with sourdough, proving baskets are useful for many bread styles. Any dough that benefits from structure during its final rise can be placed in one. Rye, whole wheat, or enriched loaves all prove well in baskets. The tool supports fermentation evenly, giving loaves a professional look and feel. - How can I prevent dough from sticking to the basket?
Proper dusting is the key. Coat the basket lightly with rice flour or line it with cloth before placing the dough. If you bake frequently, a thin natural coating builds up over time, which improves the release. Remember to keep baskets dry between uses, as moisture encourages sticking and weakens the fibers of natural cane. - How many proving baskets should a home baker own?
It depends on your baking habits. For occasional baking, one or two baskets in different shapes are sufficient. Regular bakers often keep several on hand to manage multiple loaves at once. Having a round and an oval basket covers most recipes, giving you flexibility in shaping and creating variety in your bread baking routine.
These questions highlight just how central the basket is to successful bread proving. From managing fermentation times to preventing sticking, small details make a big difference. By learning how to handle and care for this tool, you not only protect your investment but also improve your bread baking results. The more you practice, the more natural the process feels, and the proving basket becomes a trusted partner in your sourdough journey.
Mistakes to avoid in Bread Proving
Even with the right tools, bread proving can go wrong if small details are overlooked. Many bakers find that their dough fails to rise properly or collapses in the oven, not because of the recipe but due to proving errors. By understanding the most frequent mistakes, you can adjust your technique and achieve consistent results. Here are some of the most common issues to watch for when working with a proving basket.
- Over-Proving the Dough
Letting dough rest for too long causes the yeast to exhaust itself. When this happens, the dough loses strength and collapses instead of rising in the oven. The result is a flat, dense loaf with weak texture. Always check for signs of readiness, such as a gentle bounce-back when the dough is pressed lightly. - Under-Proving the Dough
Cutting proving time short leaves dough underdeveloped, producing loaves that are heavy and gummy inside. Gluten has not fully relaxed, and gas pockets have not formed properly. This mistake often occurs when bakers rush the process. It is better to allow a little extra rest than to move the dough to the oven too soon. - Not Flour-Dusting the Basket Properly
Failing to prepare the basket with flour or a liner leads to dough sticking. This can damage the shape, tear the crust, and ruin the rustic finish. Using rice flour, or a mix of rice and wheat flour, prevents this issue. Regular preparation ensures that dough releases cleanly, preserving both structure and appearance. - Ignoring Temperature and Humidity
Fermentation is highly sensitive to the environment. Proving in a very warm space can lead to rapid over-proofing, while cold conditions may slow yeast activity too much. Maintaining a balanced environment is crucial. Bakers often learn to adapt by adjusting resting times or using refrigeration to achieve the right balance of flavor and structure. - Skipping Proper Shaping Before Proving
Placing unshaped dough into a basket reduces its ability to expand properly. Shaping builds surface tension, guiding how dough rises and creating the structure needed for oven spring. Without it, the dough may spread sideways instead of upward. Taking time to shape well is essential for loaves that are tall, airy, and attractive. - Washing Natural Cane Baskets with Water
Cane banneton baskets should never be soaked or washed with soap and water. Moisture damages the fibers, encourages mold, and shortens their lifespan. Instead, clean them by brushing off flour and air drying completely. Proper care not only extends the life of the basket but also improves performance with each use.
Avoiding these mistakes ensures that your proving stage sets you up for success. Every loaf is a combination of science and craft, and attention to detail is what separates average results from bakery-quality bread. With practice, careful preparation, and the support of a reliable banneton basket, you can consistently create loaves that are both beautiful and delicious.
Conclusion
Bread baking is a craft shaped by patience, practice, and the right tools. Among all the steps that define sourdough, the proving stage is where dough develops character. A proving basket is more than a container, it is a baker’s partner in creating structure, enhancing flavor, and achieving the artisanal look that makes bread irresistible. By guiding fermentation and supporting the dough’s rise, the basket ensures each loaf has the light crumb, crisp crust, and rustic finish that bakers strive for.
Throughout this guide, we have explored the science of proving, compared materials, showcased our top-selling baskets, and highlighted the essential tools that elevate your baking routine. We have shared step-by-step instructions, answered common questions, and pointed out mistakes to avoid. Each insight is designed to help you move closer to consistent, bakery-quality results at home. Whether you are baking a simple boule or an elaborate batard, the right preparation and the right basket make all the difference.
At Bakerykart, we believe every baker deserves the confidence that comes from reliable tools. Our proving baskets and accessories are chosen for their quality, durability, and ability to deliver results. By investing in these essentials, you set yourself on a path toward loaves that are as beautiful as they are delicious.
Now it is your turn to put this knowledge into practice. Try out the tips, explore different basket sizes, and share your creations with the baking community. We would love to see how you use your proving basket and celebrate your sourdough journey. Tag us on Instagram at @bakerykart and become part of a growing family of bakers who are shaping the future of artisanal bread in their own kitchens.
Related Blog to Follow
Are you still looking for more interesting tips and idea on baking, lovely just follow our blog.
-

25-08-2025
Bread Proofing: The Secret to Perfect Loaves
Bread proofing is the key to airy, flavorful loaves. Learn methods, tools, and tips to master this essential stage in pr....
View Detail -

18-12-2018
Best Selling Dark Chocolate in India
Love chocolates? We say, bitter the better. Go on and find the exotic and interesting information about your favourite a....
View Detail -

19-06-2023
Tea, Coffee & Dessert Pairing Guide
Discover tantalizing dessert pairings that combine complementary flavors in perfect harmony, unlocking a world of culina....
View Detail