Creative Sourdough Bread Designs Using Oval Proofing Baskets
14-06-2023

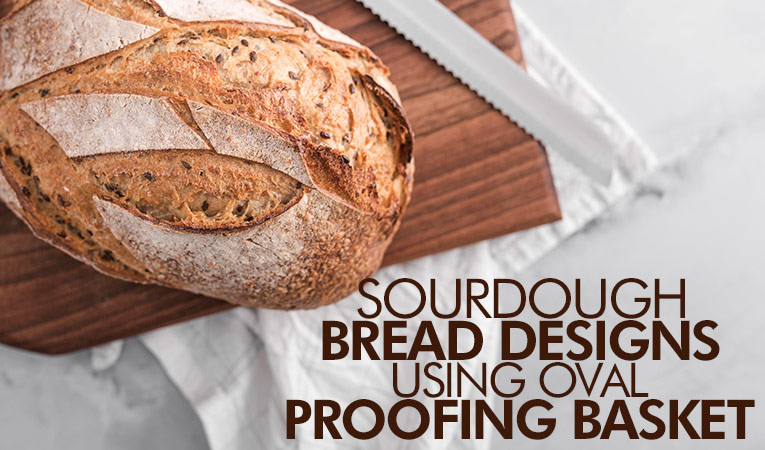
Baking sourdough bread is an art form that allows for endless creativity. Oval proofing baskets, also known as bannetons, provide a unique shape that adds elegance and style to your sourdough loaves. In this blog, we will explore various creative bread designs that can be achieved using oval proofing baskets. From classic patterns to intricate designs, let's discover the potential of these versatile tools and elevate your sourdough bread baking game.
- Classic Spiral Design: The oval shape of the proofing basket lends itself beautifully to a classic spiral design. After shaping the dough and placing it in the basket, score the top in a spiral pattern using a sharp knife or a razor blade. As the dough rises and bakes, the spiral pattern will become more pronounced, resulting in an eye-catching design.
- Leaf Imprint: Embrace the beauty of nature by using real leaves to imprint your sourdough bread. Line the bottom of the proofing basket with clean, non-toxic leaves such as grape leaves or large lettuce leaves. Place the shaped dough on top and let it rise. As the bread bakes, the imprint of the leaves will transfer onto the crust, creating a visually stunning and natural design.
- Swirl Design: Create a mesmerizing swirl pattern on your bread using an oval proofing basket. Dust the basket with flour and gently place the shaped dough inside, seam side up. With a skewer or thin, sharp object, gently swirl the surface of the dough in a circular motion, creating a spiral-like pattern. As the dough rises and bakes, the swirls will become more defined, resulting in an enticing visual effect.
- Geometric Patterns: Explore the world of geometric patterns by scoring the dough with triangles, squares, or hexagons. Use a sharp knife or a razor blade to create precise and clean lines. The oval shape of the proofing basket allows for interesting arrangements of these geometric shapes, resulting in a visually captivating bread design.
- Bursting Star Design: Create a stunning bursting star design by scoring the dough in a star shape with elongated lines radiating from the center. This design can be achieved by making deep, confident cuts into the dough using a sharp blade. As the dough rises and bakes, the star will expand and create a captivating centerpiece for your sourdough loaf.
- Scalloped Edge: Enhance the aesthetic appeal of your bread by giving it a scalloped edge. After placing the dough in the proofing basket, gently press the sides of the dough against the edges of the basket, creating a wavy or scalloped shape. As the dough rises and bakes, the scalloped edges will hold their shape, resulting in an attractive presentation.
- Crosshatch Pattern: The crosshatch pattern is a simple yet elegant design that adds a touch of sophistication to your bread. After placing the dough in the proofing basket, use a sharp knife or razor blade to make diagonal slashes across the surface of the dough. Then, make another set of diagonal slashes in the opposite direction, creating a crosshatch pattern. As the bread rises and bakes, the slashes will open up, revealing a captivating pattern.
- Stenciled Designs: Enhance your sourdough bread with stenciled designs. Place a stencil on top of the shaped dough and dust it with flour or cocoa powder. Carefully remove the stencil, and as the dough rises and bakes, the stenciled design will become more defined, adding a touch of elegance to your loaf.
- Floral Patterns: Create delicate floral patterns on your sourdough bread by using a sharp blade to score petals, leaves, or other floral shapes onto the dough's surface. These intricate designs will add a touch of beauty to your bread and make it a centerpiece on any table.
- Personalized Designs: Let your creativity run wild and personalize your sourdough bread with initials, monograms, or even small shapes that represent special occasions or interests. Use a sharp blade to carefully score these personalized designs onto the dough before baking, creating a unique and meaningful bread for yourself or as a gift.
Essential Tools for Creating Designs Using Oval Proofing Basket
Discover the essential tools you need to create stunning designs with an oval proofing basket. From the oval proofing basket itself to the bread lame, dough scraper, pastry brushes, and baking paper, these tools will help you shape, score, and enhance your bread's appearance, allowing your creativity to shine.
- Oval Proofing Basket: The oval proofing basket, also known as a banneton, is the key tool for shaping and proofing your dough. Its natural rattan or cane material creates a supportive structure and adds a distinct pattern to the bread's crust.
- Bread Lame: A bread lame is a specialized scoring tool with a sharp blade. It allows you to create precise and intricate patterns on the dough's surface, promoting controlled expansion during baking and adding visual appeal to the finished loaf.
- Dough Scraper: A dough scraper, also known as a bench scraper, is a versatile tool for handling dough. It helps you divide the dough, shape it into braids or twists, and create clean lines in your designs. Additionally, it aids in transferring the dough to the baking surface without losing its shape.
- Pastry Brushes: Pastry brushes are handy for applying washes or dusting flour onto the dough. They allow you to add texture and enhance the overall visual appeal of the bread. Use a brush to apply water, egg wash, or other liquids to create a glossy or rustic finish.
- Baking Paper: Baking paper, also known as parchment paper, is an essential tool for lining baking sheets or pans. It prevents the dough from sticking to the surface and ensures easy release after baking. Additionally, it helps retain moisture and promotes even baking.
With the right tools in hand, you can take your bread baking to the next level by creating beautiful designs using an oval proofing basket. The combination of the oval proofing basket, bread lame, dough scraper, pastry brushes, and baking paper opens up a world of possibilities for artistic bread creations. Embrace your creativity and enjoy the process of designing and baking unique and visually appealing loaves.
Top 5 FAQs: Scoring Designs with an Oval Proofing Basket
Discover answers to common questions about scoring bread dough using an oval proofing basket for stunning designs.
What is scoring, and why is it important in bread baking?
Scoring is the process of making shallow cuts on the surface of the dough just before baking. It allows the dough to expand properly during baking, prevents it from bursting in undesirable places, and creates an attractive appearance.
Can I score the dough without using a bread lame?
While a bread lame is a recommended tool for scoring, you can use a sharp knife or razor blade as an alternative. The key is to use a tool with a thin, sharp edge that will create clean cuts without compressing or tearing the dough.
What are some common scoring patterns for oval-shaped loaves?
For oval-shaped loaves, some popular scoring patterns include diagonal slashes, chevron patterns, parallel lines, or a single central slash. You can also experiment with your own unique designs to create personalized bread art.
How do I achieve a deep and bold scoring?
To achieve deep and bold scoring, make sure your scoring tool is sharp and apply firm, confident strokes while maintaining a consistent angle. It's also important to score the dough just before baking to ensure the cuts don't seal up during proofing.
How can I control the expansion of the dough during baking?
To control the expansion, you can vary the depth and angle of your cuts. Shallow cuts will allow for more controlled expansion, while deeper cuts will create more dramatic openings. Additionally, adjusting the hydration level and proofing time of the dough can also affect its expansion during baking.
Remember that scoring takes practice and each bread dough may behave differently, so don't be discouraged if you don't achieve perfect results right away. With time, observation, and experimentation, you'll develop the skills to score beautiful designs on your oval-shaped loaves using the proofing basket.
Conclusion:
If you are new to the world of sourdough bread baking, don't worry. Refer to our comprehensive guide, 'Sourdough Baking 101: A Beginner's Comprehensive Guide,' for step-by-step instructions and valuable tips. Once you have mastered the basics, you can dive into the exciting realm of creating beautiful bread designs using oval proofing baskets. Let your imagination run wild as you experiment with scoring patterns and techniques to achieve stunning results. Whether you're a seasoned baker or just starting your sourdough journey, the oval proofing basket is a valuable tool to unlock your creativity and take your bread baking to the next level. Enjoy the process, embrace your artistic side, and share your incredible bread creations with your loved ones. Happy baking!


