

Entremet Cake: A Modern Masterpiece Every Baker Must Try
01-08-2025

Entremet cake is fast becoming the crown jewel of modern pastry, transforming everyday dessert making into an extraordinary art form that excites both the eye and the palate. For chefs and bakers between the ages of 25 and 40, this layered creation presents the perfect opportunity to explore complex textures, inventive flavours, and sculpted forms that break away from traditional cake formats. With every layer crafted with intention, an entremet cake is more than a dessert, it is a reflection of precision, balance, and aesthetic expression.
The appeal of entremets lies not just in their visual elegance but in the harmony of their components. From silky mousse to sponge bases, from delicate jellies to crunchy inserts, each element contributes to a refined tasting experience. In today’s premium bakeries and pastry kitchens, entremets are no longer reserved for special occasions, they are becoming the standard of innovation. More and more chefs are choosing this style of cake to showcase technical skills, elevate their dessert menus, and create memorable plated experiences.
Unlike traditional cakes that often rely on frosting and sponge as the main building blocks, entremets are celebrated for their delicate structure and layered complexity. The journey of creating one involves careful planning, the use of specialised tools, and a deep understanding of flavour pairing. This is where the use of professional-grade Pavoni entremet moulds becomes a game changer. These moulds are not just tools, they are design frameworks that help chefs sculpt their vision into form. Whether crafting elegant domes or modern geometric shapes, Pavoni offers unmatched consistency and creative freedom to those ready to elevate their craft.
What sets the entremet cake apart is not only its visual appeal but also its ability to tell a story through layers. Each component represents a thought, a technique, a taste memory. The mirror glaze finish, the velvety exterior, the surprising centre all contribute to the storytelling power of this cake. Many chefs describe the process as both meditative and exhilarating, where patience and precision pay off in the final reveal of a perfectly cut slice showing distinct layers.
In this blog, we will explore the fundamentals of what makes an entremet so unique. From its French origins to its modern-day popularity, from the difference between entremet and cake to the essential tools used in its making, this guide will take you through every key aspect. We will highlight how Pavoni moulds bring structure and sophistication to the process, and share a curated list of entremet recipes that are both inspiring and achievable. Whether you are looking to try your first recipe or planning to take your pastry game to the next level, this guide will give you the insight and confidence to bake like an artist.
What is an Entremet Cake?
The entremet cake represents the finest evolution of modern pastry. It is a dessert that layers elegance, structure, and refined technique into a single artistic form. Inspired by classic French tradition, this cake has made its way from elaborate banquet presentations to everyday patisserie menus, winning the hearts of chefs and bakers who crave more than just sponge and frosting. In its simplest form, the entremet cake is a multi-component dessert that tells a story with each spoonful, balancing textures and flavours with precision.
At its core, this style of cake is built through layering mousse, sponge, inserts, and crunchy elements inside silicone moulds that allow for clean shapes and structured forms. It is then finished with mirror glazes or velvet sprays that enhance both the look and mouthfeel of the dessert. Because each layer must work in harmony, creating an entremet requires both planning and artistry. The process offers a rewarding challenge for chefs who want to push beyond traditional baking formats and create something truly spectacular.
Many bakers new to this format often ask about the difference between entremet and cake. The distinction lies in both form and function. While traditional cakes are baked, cooled, and decorated at room temperature using buttercream, fondant, or ganache, an entremet is a frozen, assembled dessert. Its appeal comes not only from taste but from symmetry, polish, and surprise hidden in its layers. The contrast becomes clearer with a side-by-side comparison.
| Feature | Entremet Cake | Traditional Cake |
|---|---|---|
| Structure | Multi-layered with mousse, inserts, sponge, and glaze | Typically sponge layers with frosting or ganache |
| Technique | Assembled in silicone moulds, frozen for layering and shaping | Baked, cooled, layered, and decorated at room temperature |
| Finish | Mirror glaze or velvet spray for a refined visual | Buttercream, whipped cream, or fondant for decoration |
| Texture Variety | Smooth mousse, soft sponge, crunchy elements, fluid inserts | Mostly soft sponge with creamy or dense frosting |
| Presentation | Elegant, plated dessert or patisserie showcase | Celebration-style, often served sliced at events |
| Serving Temperature | Usually served chilled or semi-frozen for structure | Served at room temperature or slightly chilled |
| Visual Appeal | High-end, polished, and designed with artistic precision | Classic look, more homely or festive depending on occasion |
| Skill Level Required | Advanced, requires planning, timing, and layering accuracy | Beginner to intermediate, more forgiving and easier to assemble |
Creating an entremet cake means balancing structure with elegance. Each element has a distinct purpose, contributing flavour, texture, or visual appeal. Below are the five essential components that make up every great entremet. Each one plays a crucial role in crafting a dessert that is cohesive, beautiful, and satisfying from the first glance to the final bite.
Mousse Layer
This component forms the foundation of the entremet and delivers the primary flavour experience. Made using whipped cream or meringue combined with chocolate, fruit purée, or nut-based mixtures, the mousse brings a smooth, airy texture that melts in the mouth. A good mousse is stable enough to hold its shape after freezing and delicate enough to feel luxurious. It surrounds the inner inserts and gives the dessert volume and flavour consistency.
Cake Base
The cake base provides structure and balance to the otherwise soft composition of the dessert. Usually a thin layer of sponge such as joconde, almond dacquoise, or génoise, this base supports the mousse and prevents collapse during slicing. The sponge is often soaked lightly in syrup or fruit purée to enhance flavour without overpowering the mousse. It gives each bite a grounded texture that holds everything together.
Inserts
Inserts offer a burst of contrast in both flavour and texture. These are often made of fruit compote, gelée, chocolate ganache, or even custard-based elements like crème brûlée. Inserts are placed inside the mousse layer during assembly and are typically frozen in advance for perfect placement. Their surprise appearance in each slice elevates the entremet, making every portion a layered journey of taste.
Crunchy Layer
This layer adds the much-needed textural contrast to an otherwise smooth and soft dessert. Ingredients like feuilletine, praline paste, nuts, or chocolate-coated cereal pearls are combined to form a crisp base or interlayer. Positioned near the sponge or insert, the crunchy layer brings complexity and bite. It enhances the mouthfeel and keeps the dessert exciting from start to finish.
Glaze or Velvet Finish
The final finish defines the visual identity of the entremet. Mirror glaze delivers a glossy, reflective surface that showcases colour and precision, while velvet sprays create a matte, professional look using a mixture of cocoa butter and chocolate. These finishes not only add elegance but also seal the dessert and preserve texture until serving. A well-finished entremet looks polished and ready to impress.
Each of these components is important on its own, but together they create a dessert that reflects modern patisserie at its best. The entremet cake is more than just a pretty dessert, it is a thoughtful composition of layers, each chosen for its role in the flavour story. The comparison with traditional cakes is not meant to replace them, but to highlight how the entremet has become the preferred canvas for chefs who wish to experiment, express, and elevate their craft.
The Creative Playground – Why Chefs and Bakers Love Entremet Cakes
The art of pastry is evolving, and chefs today are looking beyond traditional formats to explore new ways of telling stories through flavour, texture, and design. The entremet cake has emerged as a favourite among modern bakers because it invites a deeper level of creativity. Every element in this dessert is an opportunity to innovate, refine, and express a culinary point of view. Whether it is the mousse that defines the core flavour or the glaze that sets the tone visually, each layer becomes a tool of self-expression. Chefs and pastry artists no longer see desserts as a sweet end to the meal but as a powerful platform to demonstrate technical skill and creative identity.
The structure of an entremet supports artistic freedom while maintaining balance and discipline. Its components are designed to complement one another, yet within that structure lies infinite room for experimentation. The result is a dessert that is visually polished and deeply layered in taste. These qualities have made it an essential feature in fine patisseries and a compelling challenge for professional bakers across the world.
Here are five reasons why chefs love working with this refined, multi-layered format:
- Layering enables flavour storytelling with intention
Each layer of an entremet serves a purpose in the overall narrative. A chef might begin with a tangy fruit mousse to establish brightness, follow it with a smooth insert of ganache for richness, add a nutty sponge for texture, and finish with a lightly floral glaze. This allows every bite to unfold in stages, surprising the diner and creating an emotional connection through taste. - Silicone moulds unlock new shapes and creative direction
Unlike traditional cakes that rely on simple round or square formats, entremet moulds offer sculptural flexibility. Domes, cubes, petals, spirals, and wave patterns let chefs explore form as part of their flavour message. The shape of a dessert influences how it is plated and perceived, allowing pastry to move closer to the realm of visual art. - Finishes bring mood and message to the surface
Mirror glazes, velvet sprays, and metallic tints turn the exterior of an entremet into a powerful statement. The shine of a mirror glaze can evoke elegance, while a velvet finish brings softness and luxury. By selecting colours, textures, and garnishes thoughtfully, chefs elevate not just appearance but also anticipation. - Unusual flavour pairings find harmony in entremet form
The multi-component nature of this dessert allows for thoughtful juxtaposition. Chefs are increasingly using flavour combinations like black sesame and citrus, coffee and rose, or coconut and saffron. Because each element can be isolated and balanced against the others, it becomes easier to build contrast without overpowering subtlety. - Every creation is a personal signature of culinary craftsmanship
From seasonal inspirations to cultural storytelling, an entremet can be tailored to match the chef’s creative vision. It might reflect a memory, pay tribute to a place, or simply showcase technical finesse. This makes each dessert unique, both in its flavour structure and in its visual impact.
What makes the entremet cake especially exciting is its ability to bridge classic techniques with modern presentation. It honours precision while encouraging invention. For chefs who seek to move beyond formulas and into creative mastery, this dessert is not just a challenge, it is an open canvas. In today’s pastry world, it has become one of the most rewarding formats to work with, offering depth, discipline, and unlimited potential to innovate.
Pavoni Entremet Moulds – The Secret Weapon for Stunning Layers
The quality of a finished dessert often begins with the quality of the tools used to shape it. For chefs working with intricate multi-layered formats like the entremet cake, precision matters at every stage of assembly. This is where Pavoni entremet moulds come in. Known for their durability, flexibility, and refined design, these silicone moulds have become an essential part of every serious pastry kitchen. They do more than just hold the dessert’s shape. They guide its form, protect its structure, and ultimately define how clean and polished the final result will be.
The use of moulds is not just about convenience. It is about consistency, creativity, and achieving a level of finish that elevates the dessert from excellent to extraordinary. Each Pavoni mould is crafted with the needs of pastry professionals in mind, whether they are working on a domed individual portion or a bold geometric entremet for a plated showcase. With the right mould, chefs can confidently bring their vision to life.
Here are five reasons why Pavoni moulds have become the go-to choice for entremet-making professionals around the world:
- Perfect shapes with clean lines and even distribution
Pavoni moulds are designed to deliver crisp outlines and proportional depth, allowing every layer to settle evenly within the form. This consistency ensures a balanced look once the dessert is unmoulded. Whether a chef is building multiple portions for retail or creating a centrepiece for a showcase, these moulds help maintain a flawless, uniform result from top to base. - Smooth release without damaging delicate textures
The non-stick silicone surface of Pavoni moulds enables a clean and effortless release, even for mousse or gelée-based layers. This is especially critical for desserts that involve freezing and glazing, as any imperfections can affect the final presentation. The flexibility of the mould supports the integrity of each layer without tearing or crumbling the structure during demoulding. - Variety of creative shapes that support design innovation
Pavoni offers moulds in a wide range of artistic designs, including domes, spirals, cubes, petals, and abstract sculptural forms. Each shape is engineered to help chefs add dimension and character to their desserts. This variety encourages experimentation and supports flavour storytelling by letting visual elements reflect the concept or inspiration behind the dish. - Support for advanced techniques like glazing and spraying
The smooth surface and well-defined form of Pavoni moulds make them ideal for professional finishes such as mirror glazes or velvet sprays. A seamless surface means glazes flow evenly and do not pool or break. This results in a high-gloss or matte finish that looks consistent, luxurious, and photo-ready from every angle. - Reliability and performance under repeated use
These moulds are built to perform in the high-paced environment of commercial kitchens. They can handle multiple cycles of freezing and cleaning without warping or losing flexibility. Their long-lasting nature makes them not only a creative asset but also a practical investment for pastry teams and boutique dessert shops looking for consistency in production.
Working with entremet cake formats means paying attention to every millimetre of detail. Each layer needs to hold its shape, every glaze needs to flow properly, and the final dessert must reflect the chef’s design exactly as imagined. Pavoni entremet moulds enable that level of control. They help transform bold ideas into perfectly structured desserts that delight visually and tastefully. For chefs looking to refine their presentation, speed up workflow, or push the boundaries of shape and structure, Pavoni offers a trusted foundation to build on.
Top Entremet Cake Recipes – Trend-Forward Inspirations
The beauty of the entremet cake lies in how it blends flavour, texture, and form into one composed creation. Using Pavoni entremet moulds, chefs can design desserts that are not only visually striking but also seasonally relevant, emotionally expressive, and gastronomically balanced. Each of the moulds shown below tells a different story, whether inspired by nature, celebration, or geometry. These entremet cake ideas pair mould design with thoughtful flavour composition to help chefs create recipes that leave a lasting impression.

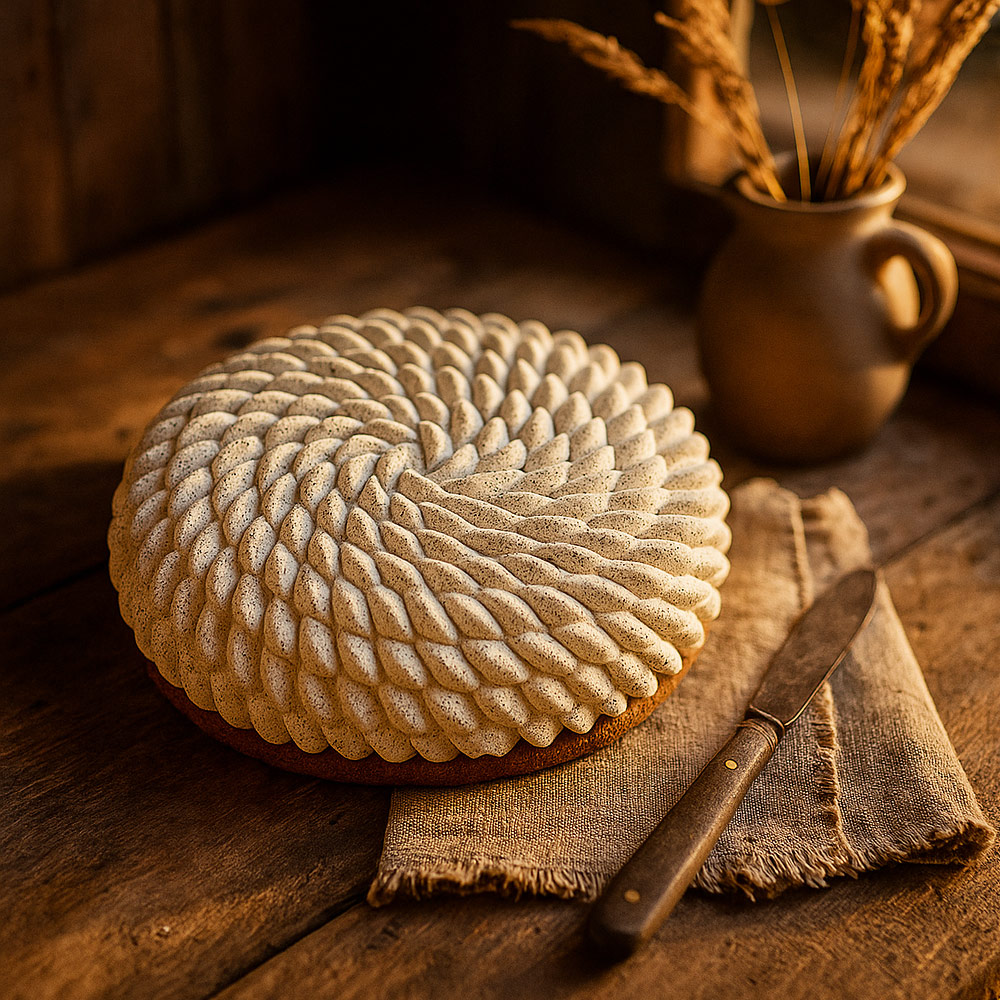
Hazelnut Chestnut Velvet Entremet
This velvety smooth Hazelnut Chestnut Entremet is a tribute to autumnal flavors. Crafted with Pavoni’s Dentelle KE082S Cake Mould, it features layers of hazelnut sponge, chestnut mousse, hazelnut praline crisp, and a silky vanilla insert. Finished with a velvet cocoa butter spray, this stunning dessert delivers texture, balance, and seasonal warmth.
Ingredients:
- Chestnut Mousse: 300g sweetened chestnut purée, 250ml whipped cream, 3 gelatin sheets, 40ml milk, 30g sugar
- Vanilla Insert: 200ml cream, 1 vanilla bean, 2 egg yolks, 40g sugar, 2g gelatin
- Hazelnut Sponge: 2 eggs, 80g sugar, 60g hazelnut flour, 20g all-purpose flour, 30g butter (melted)
- Hazelnut Praline Crunch: 80g hazelnut praline paste, 50g milk chocolate, 40g feuilletine flakes
- Velvet Spray Coating: 200g white chocolate, 100g cocoa butter, ivory food coloring (fat-soluble)
- Decoration: 1 whole roasted hazelnut for center, optional gold dust
Step-by-Step Instructions:
- Step 1: Prepare Vanilla Insert
Heat cream with split vanilla bean and infuse for 15 minutes. In another bowl, whisk egg yolks and sugar. Temper with warm cream, return to heat and cook to 82°C. Add gelatin and strain. Pour into small insert mould and freeze until firm. - Step 2: Make Hazelnut Sponge
Beat eggs with sugar until pale and tripled in volume. Gently fold in sifted flours and hazelnut meal. Stir in melted butter. Spread onto a lined baking tray and bake at 180°C for 8–10 minutes. Cool and cut to mould size. - Step 3: Make Praline Crunch Layer
Melt milk chocolate and combine with hazelnut praline paste. Fold in feuilletine flakes. Spread into a silicone disc mould to form a crunchy layer. Freeze until solid. - Step 4: Prepare Chestnut Mousse
Bloom gelatin in cold water. Warm milk with sugar and dissolve gelatin. Blend in chestnut purée until smooth. Cool to 30–32°C and fold in whipped cream to make a light mousse. - Step 5: Assemble the Entremet
Fill Pavoni entremet mould halfway with chestnut mousse. Insert frozen vanilla cream disc, then pipe more mousse. Place praline crunch disc and finish with hazelnut sponge. Level the top and freeze the entire mould for 6–8 hours. - Step 6: Velvet Spray Finish
Melt white chocolate and cocoa butter together. Add ivory color and emulsify. Cool to 32°C and use a spray gun to apply the velvet finish on the frozen cake, working quickly for a perfect texture. - Step 7: Garnish and Serve
Place a roasted hazelnut in the center cavity. Add gold dust for elegance if desired. Let the entremet thaw in the fridge for 4–6 hours before slicing and serving.
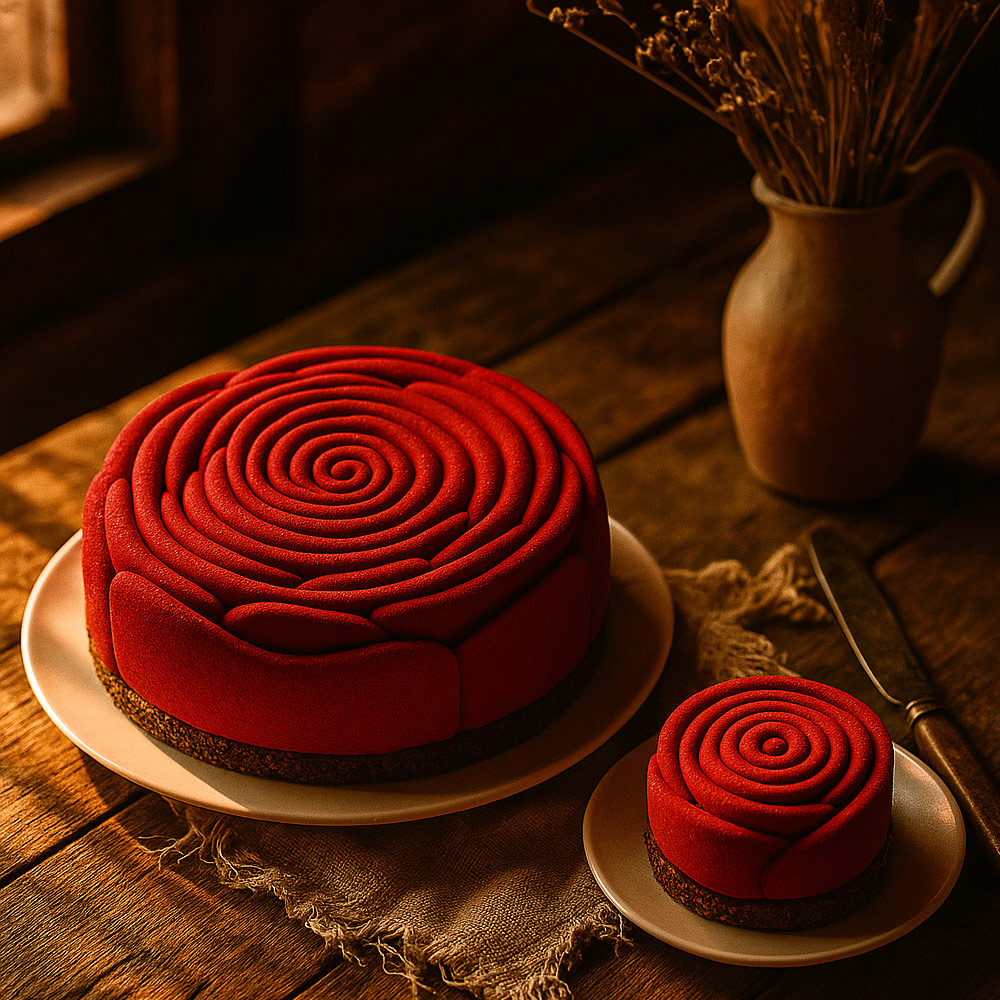
Ruby Red Rose Entremet
This romantic Ruby Red Rose Entremet blends berry and ruby chocolate flavors into a delicate La Vie en Rose KE080S Cake Mould by Pavoni. A raspberry coulis insert and white chocolate vanilla mousse sit on a chocolate sponge biscuit base, all wrapped in a red velvet cocoa butter spray. It’s a perfect dessert for anniversaries, festive dinners, or a bold patisserie display.
Ingredients:
- Ruby Chocolate Mousse: 250g ruby chocolate, 250ml cream, 2 gelatin sheets, 40ml milk
- Raspberry Coulis Insert: 200g fresh raspberries, 40g sugar, 1 tsp lemon juice, 2 gelatin sheets
- Chocolate Sponge Base: 2 eggs, 60g sugar, 40g flour, 20g cocoa powder, 30g melted butter
- White Chocolate Vanilla Mousse: 150g white chocolate, 200ml whipped cream, 2g gelatin, 30ml milk, vanilla extract
- Velvet Spray Coating: 200g white chocolate, 100g cocoa butter, red fat-soluble food color
- Decoration: Optional freeze-dried raspberries or rose petals for garnish
Step-by-Step Instructions:
- Step 1: Prepare Raspberry Coulis Insert
Cook raspberries with sugar and lemon juice over medium heat. Blend and strain to remove seeds. Bloom gelatin and add to the warm coulis. Pour into spiral insert mould and freeze until solid. - Step 2: Make Chocolate Sponge Base
Whip eggs and sugar until fluffy. Fold in sifted flour and cocoa powder. Add melted butter. Bake in a sheet tray at 180°C for 10 minutes. Cool and cut to mould size. - Step 3: Prepare White Chocolate Vanilla Mousse
Heat milk and dissolve gelatin. Pour over chopped white chocolate and stir until smooth. Cool, add vanilla, then fold in whipped cream to create a fluffy mousse. - Step 4: Assemble Inner Layers
Fill Pavoni mould halfway with ruby chocolate mousse. Place the frozen raspberry insert, then pipe a layer of vanilla mousse. Insert the sponge base on top and freeze completely for 6–8 hours. - Step 5: Velvet Coating
Melt white chocolate with cocoa butter and add red coloring. Cool to 32°C and spray over the frozen cake with a velvet spray gun to create a uniform rose-textured coating. - Step 6: Final Touches
Carefully demould the cake. Garnish the base with freeze-dried raspberries or edible rose petals if desired. Let it thaw in the fridge for 4–5 hours before serving for optimal texture.
Twist Hazelnut Vanilla Entremet
This elegant Twist Hazelnut Vanilla Entremet features velvety textures and balanced flavors built inside a Pavoni twist mould. With layers of hazelnut praline crunch, vanilla bean mousse, and caramelized milk chocolate crémeux, this cake offers a refined presentation and a smooth nutty finish. Perfect for gifting or elevating a patisserie menu.
Ingredients:
- Vanilla Bean Mousse: 300ml cream, 2 vanilla pods, 60ml milk, 80g white chocolate, 2 gelatin sheets
- Caramelized Milk Chocolate Crémeux: 200g milk chocolate, 200ml cream, 3 egg yolks, 30g sugar
- Hazelnut Praline Crunch: 80g hazelnut praline paste, 40g feuilletine, 40g milk chocolate
- Almond Sponge Base: 2 eggs, 60g sugar, 30g ground almonds, 30g flour, 20g melted butter
- Velvet Spray Coating: 150g white chocolate, 75g cocoa butter, ivory fat-soluble color
Step-by-Step Instructions:
- Step 1: Make the Almond Sponge
Whisk eggs and sugar until pale and fluffy. Fold in flour and ground almonds, then add melted butter. Spread in a tray and bake at 180°C for 10 minutes. Cool and cut to size. - Step 2: Prepare Hazelnut Praline Crunch
Melt milk chocolate and mix with hazelnut praline and feuilletine. Spread in a ring on a tray and freeze until firm. This will be your crunch insert. - Step 3: Cook Caramelized Milk Chocolate Crémeux
Heat cream and sugar, temper with egg yolks, cook to 82°C, then pour over chopped caramel milk chocolate. Blend until smooth. Pour into insert moulds and freeze. - Step 4: Prepare Vanilla Mousse
Heat milk with scraped vanilla pods. Bloom gelatin and dissolve in hot milk, then pour over white chocolate. Cool and fold in semi-whipped cream for a smooth mousse texture. - Step 5: Assemble the Entremet
Fill the Pavoni twist mould halfway with vanilla mousse. Add frozen crémeux and crunch insert, then top with almond sponge. Freeze completely for 8 hours or overnight. - Step 6: Velvet Spray Finish
Melt cocoa butter and white chocolate together, tint with ivory color. Cool to 32°C and spray over frozen cake for a smooth spiral velvet effect. - Step 7: Serve
Let the cake thaw in the fridge for 5 hours before serving. Decorate minimally or leave as is to highlight the architectural mould design.
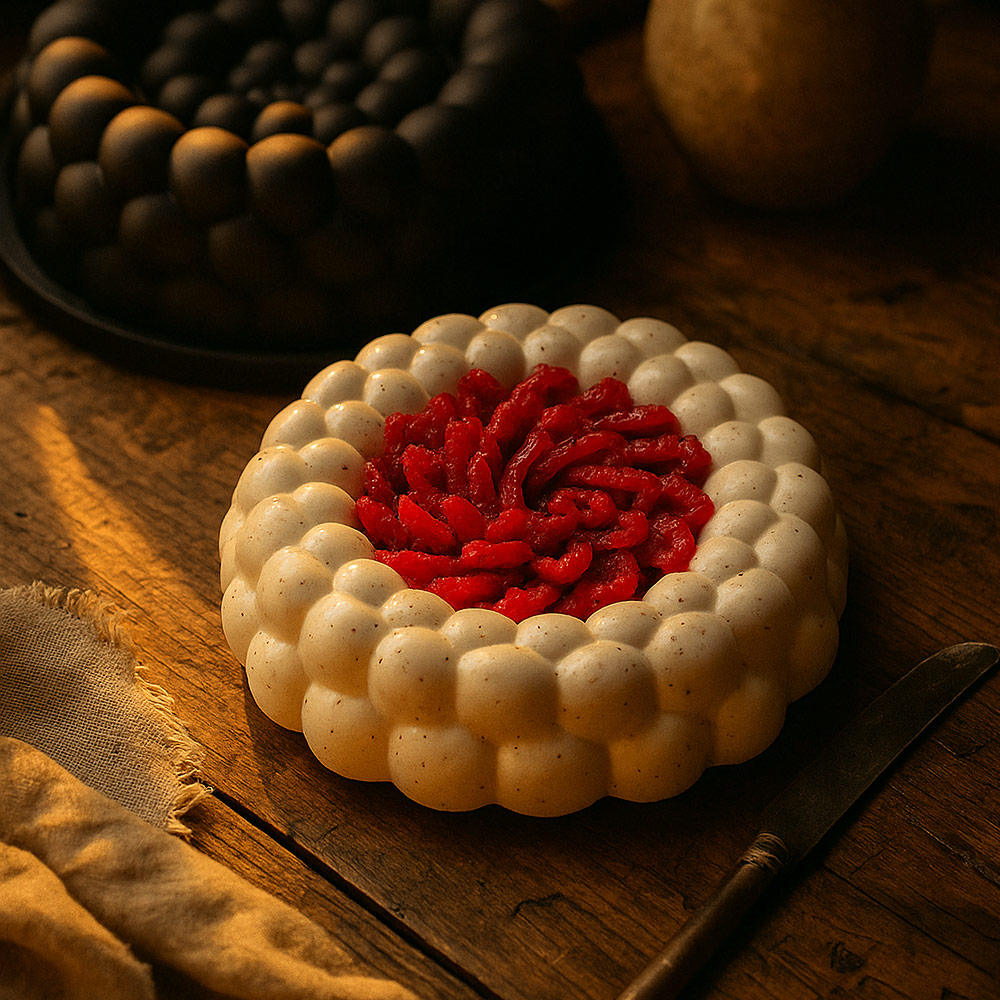
Berry Vanilla Bubble Entremet
This Berry Vanilla Bubble Entremet is a visual and textural delight, made in a Nuage KE088S Cake Mould. The exterior features a silky vanilla bean mousse sprayed with a neutral velvet coating, while the vibrant red center hides a tangy berry compote. Balanced with a soft sponge base and crisp almond sable, this entremet is a celebration of contrast and finesse.
Ingredients:
- Vanilla Mousse: 250ml heavy cream, 80ml milk, 70g white chocolate, 2 vanilla pods, 3 gelatin sheets
- Red Berry Compote: 200g mixed berries (strawberry, raspberry), 40g sugar, 1 tsp lemon juice, 2g pectin
- Almond Sablé Base: 100g butter, 90g flour, 40g icing sugar, 20g almond flour, 1 egg yolk
- Neutral Velvet Spray: 150g white chocolate, 75g cocoa butter, ivory color (optional)
- Garnish: Fresh berry glaze or strawberry gel curls
Step-by-Step Instructions:
- Step 1: Prepare the Almond Sablé Base
Mix butter, sugar, and egg yolk until smooth. Add flour and almond flour, combine into a dough, chill for 1 hour. Roll to 3mm and bake at 170°C for 12–14 minutes until golden. - Step 2: Make the Red Berry Compote
Heat berries and sugar in a pan. Add pectin and lemon juice, simmer until slightly thickened. Pour into a dome insert mould and freeze for at least 4 hours. - Step 3: Create Vanilla Bean Mousse
Heat milk and scraped vanilla pods. Add bloomed gelatin and pour over chopped white chocolate. Stir until melted, then cool. Fold in softly whipped cream for a smooth mousse texture. - Step 4: Assemble the Entremet
Fill the Pavoni bubble mould halfway with vanilla mousse. Add frozen berry compote insert in the center. Add a thin layer of mousse and place the baked sablé base on top. Freeze overnight. - Step 5: Unmould and Velvet Spray
Unmould the entremet and spray with a neutral velvet made from melted white chocolate and cocoa butter, tinted lightly with ivory fat-soluble color. Ensure cake is frozen before spraying. - Step 6: Final Garnish
Arrange strawberry curls or fruit glaze in the center cavity for a pop of color and added tartness. Let thaw in the refrigerator for 4–5 hours before serving.
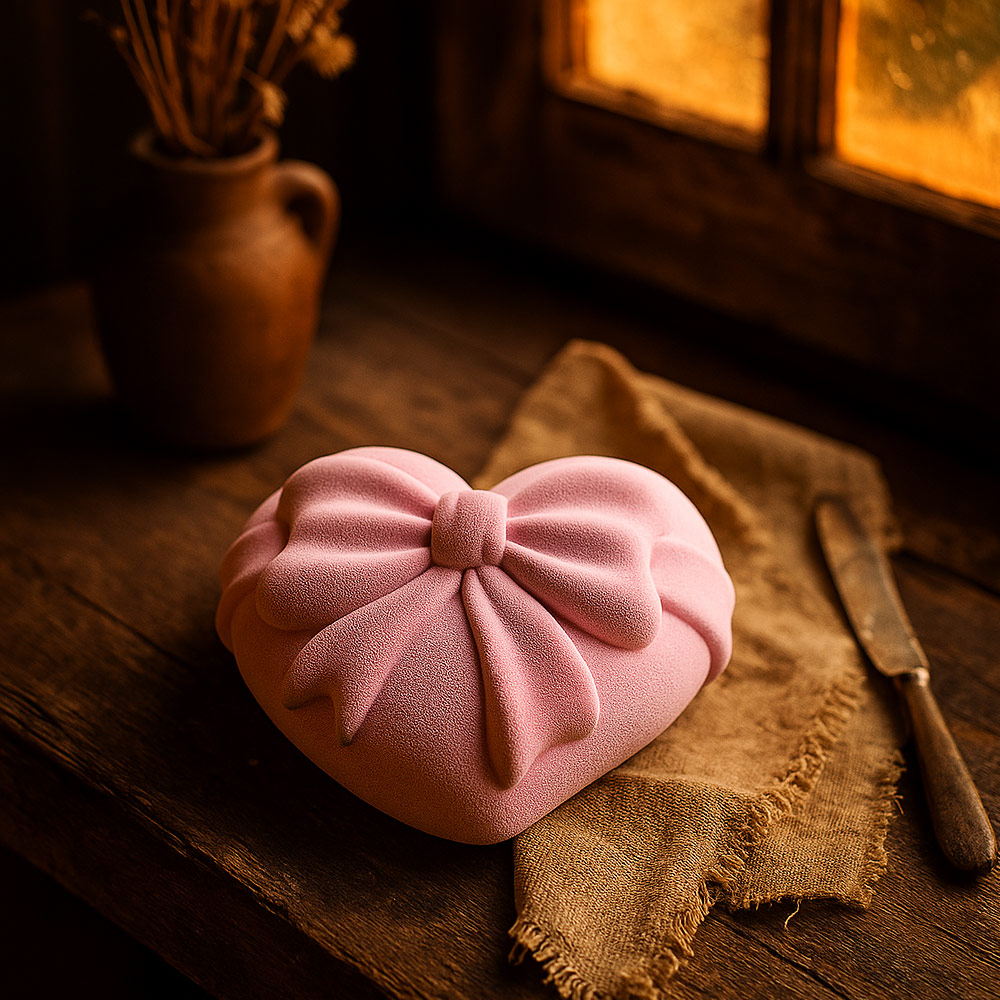
Valentine Heart Mousse Cake
This Valentine Heart Mousse Cake combines delicate raspberry mousse with a tangy lychee insert and a vanilla sponge base, all enveloped in a soft pink velvet spray. Crafted using a Cadeau KE075S Cake Mould with a bow detail, this elegant dessert is ideal for gifting your loved one. Each layer is thoughtfully designed to offer light textures and fruity romance in every bite.
Ingredients:
- Raspberry Mousse: 250g raspberry purée, 50g sugar, 4 gelatin sheets, 200ml whipped cream
- Lychee Jelly Insert: 150g canned lychee purée, 30g sugar, 2 gelatin sheets
- Vanilla Sponge Base: 2 eggs, 60g sugar, 60g flour, 1 tsp vanilla extract
- Pink Velvet Spray: 150g white chocolate, 75g cocoa butter, fat-soluble pink color
- Decoration: Bow-shaped heart mould (e.g., Pavoni Love or Cuore mould)
Step-by-Step Instructions:
- Step 1: Prepare the Lychee Insert
Bloom gelatin in cold water. Heat lychee purée with sugar, then dissolve the gelatin into the warm mixture. Pour into a mini heart insert mould and freeze for 4 hours or overnight. - Step 2: Make the Raspberry Mousse
Heat raspberry purée and sugar. Add bloomed gelatin until dissolved. Cool to room temperature. Fold in whipped cream gently to maintain volume. Keep chilled while assembling. - Step 3: Bake the Vanilla Sponge
Whip eggs and sugar until pale and fluffy. Fold in sifted flour and vanilla extract. Spread on a tray and bake at 180°C for 10 minutes. Cut out a heart base slightly smaller than the mould. - Step 4: Assemble the Entremet
Fill the Pavoni heart mould halfway with raspberry mousse. Place the frozen lychee insert in the center. Add more mousse and top with the sponge base. Smooth and freeze overnight. - Step 5: Velvet Spray Coating
Unmould the frozen heart cake. Melt white chocolate and cocoa butter together, add fat-soluble pink color. Spray the frozen cake with a velvet spray gun or airbrush for a soft matte finish. - Step 6: Final Touch
Allow to defrost in the refrigerator for 5–6 hours before serving. Present as is or with a light dusting of freeze-dried raspberry powder or edible gold dust for added elegance.
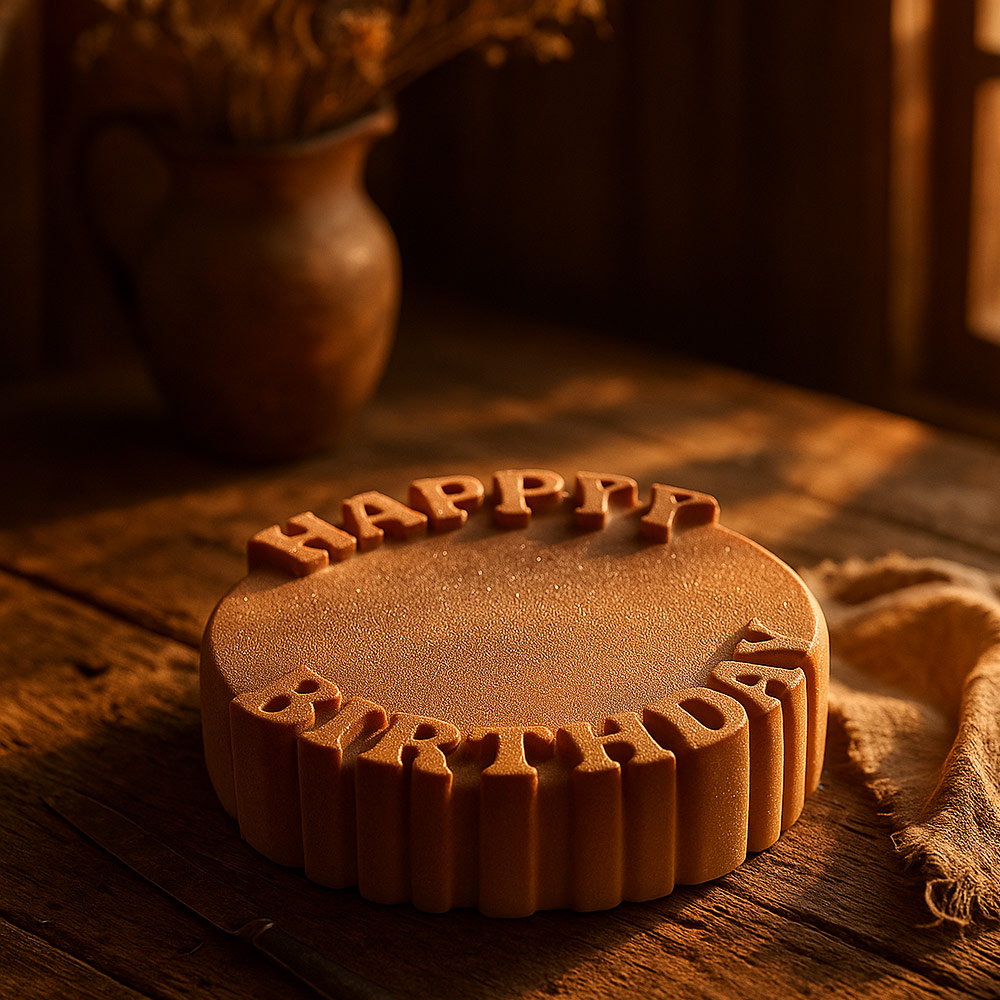
Happy Birthday Entremet Cake
This Happy Birthday Entremet Cake brings together layers of caramel mousse, chocolate ganache, and almond sponge, all finished with a bronze velvet spray that highlights the embedded birthday message mould. With rich textures and a celebratory look, this cake is the perfect centrepiece for special birthday moments.
Ingredients:
- Caramel Mousse: 200g sugar, 100ml water, 300ml cream, 4 gelatin sheets, 200ml whipped cream
- Chocolate Ganache Insert: 150g Callebaut dark chocolate, 150ml cream, 1 tbsp butter
- Almond Sponge Base: 3 eggs, 80g caster sugar, 40g almond flour, 40g all-purpose flour, 1 tsp vanilla
- Bronze Velvet Spray: 150g white chocolate, 75g cocoa butter, bronze fat-soluble powder
- Tools: Pavoni “Happy Birthday” silicone mould
Step-by-Step Instructions:
- Step 1: Prepare Chocolate Ganache Insert
Heat cream until it begins to simmer. Pour over chopped chocolate and stir until smooth. Add butter for sheen. Pour into a smaller insert mould and freeze for at least 4 hours. - Step 2: Make the Almond Sponge Base
Whip eggs and sugar until light and fluffy. Fold in sifted almond and all-purpose flour along with vanilla. Spread on a baking tray and bake at 180°C for 10 minutes. Cut to fit the mould base. - Step 3: Caramel Mousse Preparation
Caramelise sugar with water until golden. Deglaze with cream carefully and stir until smooth. Add bloomed gelatin. Let it cool, then fold in whipped cream gently to create a light mousse. - Step 4: Assemble the Cake
Pipe caramel mousse halfway into the Pavoni “Happy Birthday” mould. Place the frozen chocolate ganache insert in the center. Add more mousse and then the almond sponge. Level and freeze overnight. - Step 5: Apply Bronze Velvet Spray
Unmould the frozen entremet cake. Melt white chocolate and cocoa butter, stir in bronze fat-soluble powder. Use a spray gun to apply an even coat on the frozen cake for a matte velvet finish. - Step 6: Serve with Style
Allow the cake to defrost in the fridge for 6 hours before serving. Garnish with gold leaf accents or a candle to complete the birthday celebration vibe.
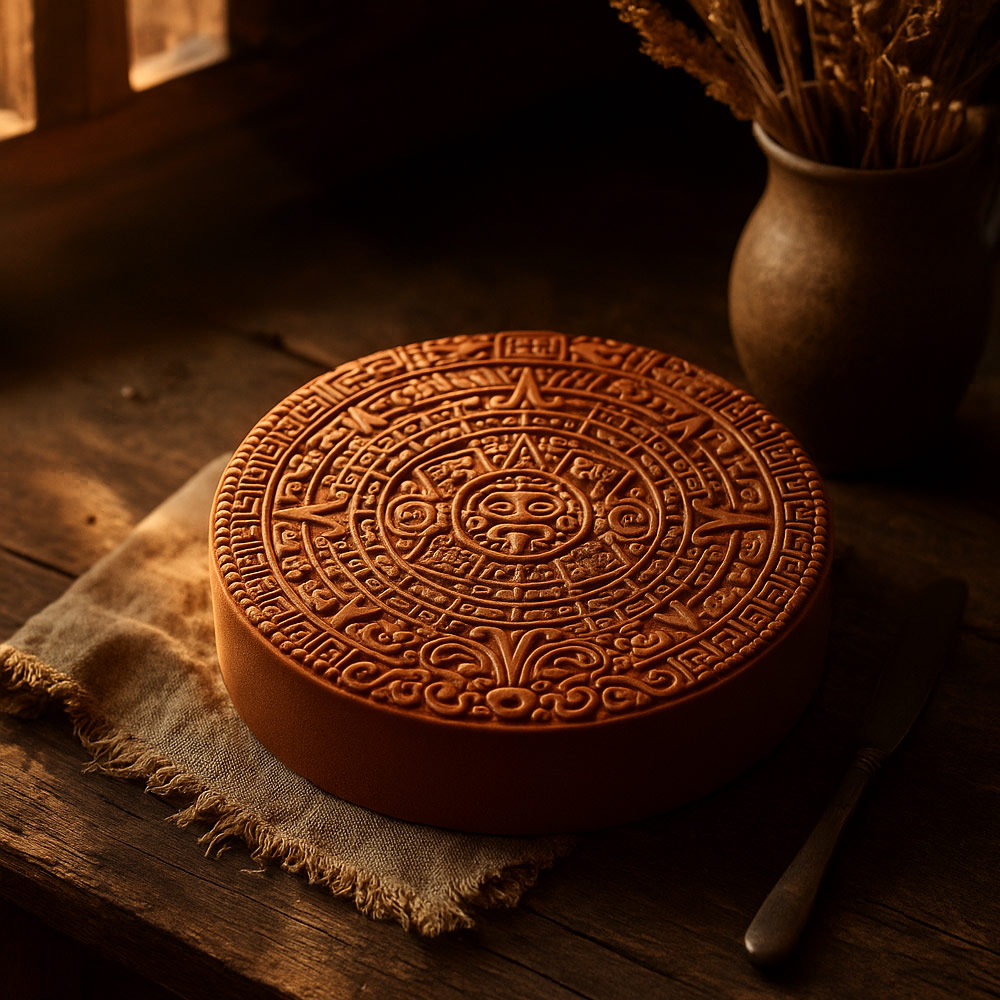
Mayan Cocoa Temple Entremet Cake
Inspired by the sacred motifs of ancient Mayan temples, this entremet cake is a visual marvel with layers of intense chocolate crémeux, spiced ganache, and almond joconde sponge. It is cast in a Foresta KE100S Cake Mould that captures every symbolic detail, making it a celebration of culture, history, and refined pastry technique.
Ingredients:
- Spiced Dark Chocolate Ganache: 200g Callebaut 70.5% dark chocolate, 200ml cream, 1/2 tsp cinnamon, pinch of chili powder
- Chocolate Crémeux: 200ml milk, 100ml cream, 3 egg yolks, 40g sugar, 150g Callebaut chocolate, 2g gelatin
- Almond Joconde Sponge: 3 eggs, 90g almond flour, 90g icing sugar, 30g all-purpose flour, 3 egg whites, 30g butter
- Velvet Spray: 150g white chocolate, 75g cocoa butter, copper and brown fat-soluble colors
- Tools: Aztec or Mayan circular silicone entremet mould
Step-by-Step Instructions:
- Step 1: Make the Almond Joconde Sponge
Whisk eggs, almond flour, and icing sugar until light. Separately whip egg whites to soft peaks, then fold in. Sift in flour and mix gently. Add melted butter. Bake at 180°C for 10 minutes, cool, and cut to fit the base of the mould. - Step 2: Prepare the Spiced Ganache Insert
Heat cream with cinnamon and chili powder. Pour over chopped dark chocolate and stir until fully melted and glossy. Pour into a round insert mould and freeze until solid. - Step 3: Chocolate Crémeux Filling
Heat milk and cream together. In a separate bowl, whisk yolks with sugar. Temper with hot cream mixture, return to heat, and cook until it coats the back of a spoon. Add gelatin and pour over chopped chocolate. Emulsify until smooth, then cool slightly. - Step 4: Assemble the Entremet
Pour a layer of chocolate crémeux into the detailed mould. Insert the frozen spiced ganache disc. Add another layer of crémeux and finish with the almond sponge. Level and freeze overnight. - Step 5: Apply Velvet Spray
Prepare the velvet spray by melting cocoa butter and white chocolate, then adding fat-soluble copper and brown colorants. Spray onto the frozen entremet cake for a terracotta-stone effect that enhances the intricate mould design. - Step 6: Finishing Touch
Thaw in the refrigerator for 5–6 hours before serving. Optionally, highlight select pattern details with edible bronze dust using a soft brush to emphasize the ancient motif.
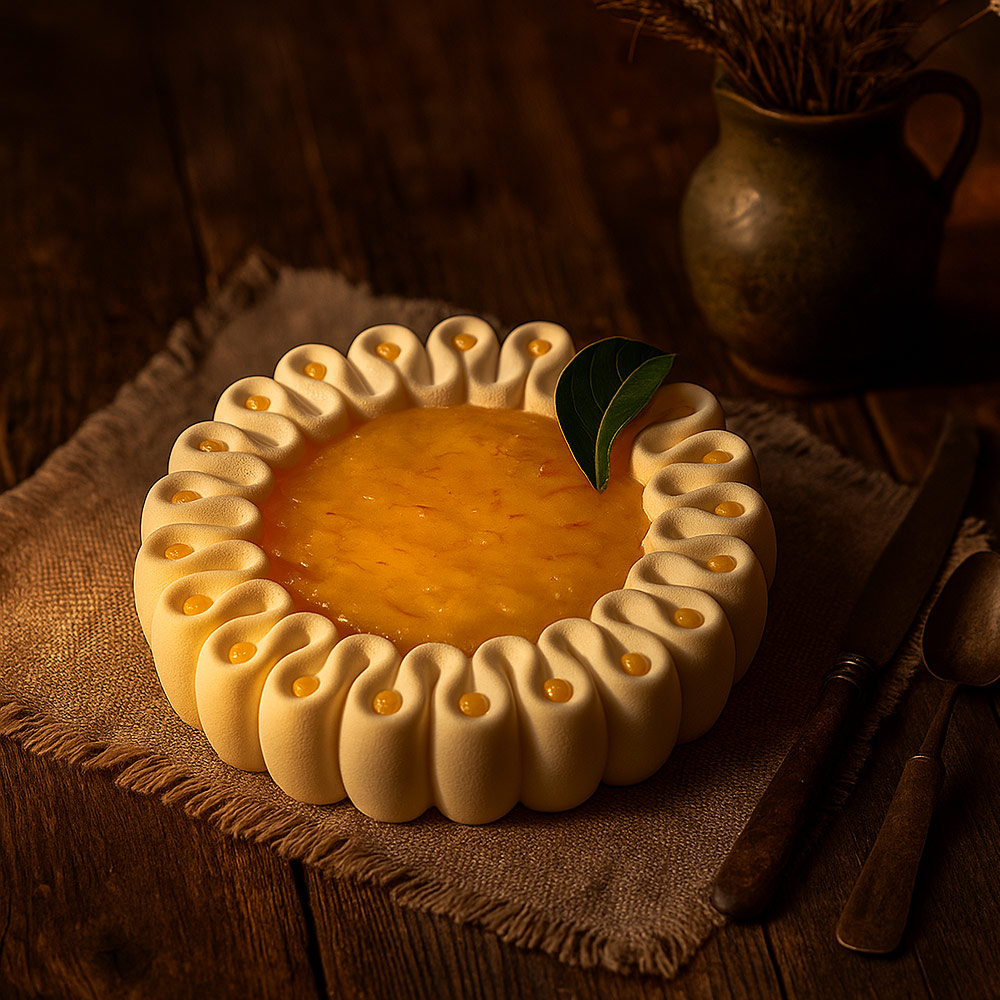
Mango Passion Daisy Entremet Cake
This radiant entremet cake takes inspiration from tropical fruits and floral design. Created using a Ondulation KE101S Cake Mould, it features a refreshing mango-passion fruit jelly center, surrounded by layers of vanilla mousse and almond sponge. Finished with a delicate velvet spray and topped with a glossy fruit glaze, this cake is the perfect tribute to sunny flavours and elegant pâtisserie.
Ingredients:
- Mango Passion Jelly: 200g mango purée, 100g passion fruit pulp, 60g sugar, 6g gelatin (bloomed)
- Vanilla Bean Mousse: 250ml whipping cream, 150ml milk, 60g sugar, 3 egg yolks, 1 vanilla bean, 5g gelatin, 100g white chocolate
- Almond Sponge Base: 2 eggs, 60g almond flour, 60g icing sugar, 20g all-purpose flour, 2 egg whites, 20g butter
- Velvet Spray: 150g white chocolate, 75g cocoa butter, ivory and yellow fat-soluble color
- Tools: Flower or daisy-shaped entremet silicone mould
Step-by-Step Instructions:
- Step 1: Prepare the Mango Passion Jelly
Combine mango purée, passion fruit pulp, and sugar in a saucepan. Warm slightly, then add bloomed gelatin and stir until fully dissolved. Pour into a shallow disc mould and freeze overnight. - Step 2: Make the Almond Sponge Base
Whisk eggs, almond flour, and icing sugar until pale and thick. Fold in sifted flour and separately whipped egg whites. Add melted butter gently and spread on a lined baking tray. Bake at 180°C for 10–12 minutes and cut to the mould’s base size. - Step 3: Prepare Vanilla Bean Mousse
Heat milk with vanilla bean seeds and pod. In a bowl, whisk yolks and sugar. Temper with hot milk, then cook gently to 82°C. Remove the pod, add gelatin, and pour over chopped white chocolate. Cool to 30°C, then fold in whipped cream to create a light mousse. - Step 4: Assemble the Entremet
Fill the silicone mould halfway with vanilla mousse. Insert the frozen mango-passion jelly in the center. Cover with more mousse and place the almond sponge as the base layer. Smooth the top and freeze overnight. - Step 5: Apply Velvet Spray
Melt white chocolate and cocoa butter together, add ivory and a hint of yellow fat-soluble color. Spray onto the frozen cake to create a soft, matte finish that mimics fresh flower petals. - Step 6: Final Glaze and Leaf Garnish
Add a dollop of leftover mango-passion glaze in each petal cavity and pour extra glaze in the center. Finish with an edible leaf or mint sprig for a fresh garden touch.
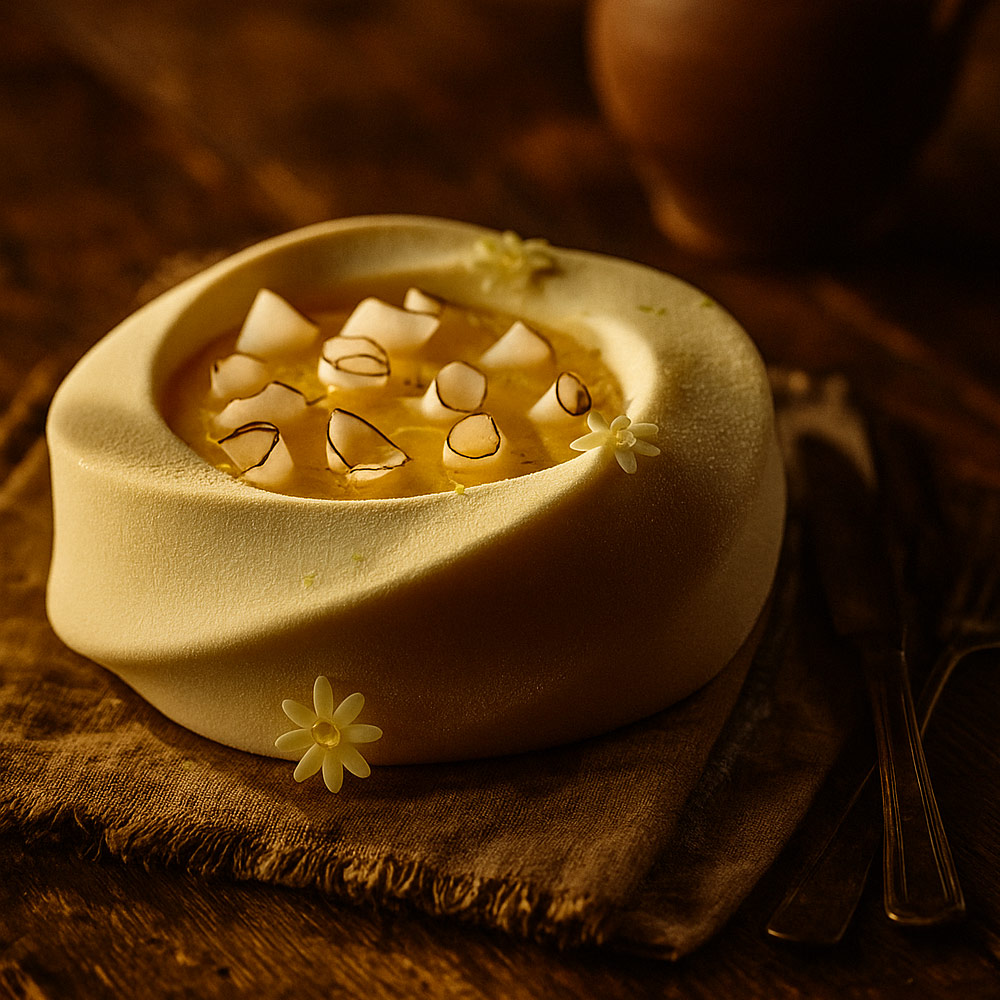
Yuzu Pear Bloom Entremet Cake
This refined entremet features a bright yuzu citrus and pear flavor combination wrapped in a sculpted mousse with elegant floral garnish. The delicate swirl of the Karma KE103S Cake Mould gives the cake a fluid and natural shape, enhancing its artisanal character. Fresh pear cubes, yuzu curd, and almond sponge come together for a dessert that is as elegant as it is flavorful.
Ingredients:
- Yuzu Curd: 120ml yuzu juice, 2 eggs, 80g sugar, 1 tsp cornstarch, 60g butter
- Pear Compote Insert: 150g ripe pear (diced), 30g sugar, 1 tsp lemon juice, 2g gelatin
- Almond Sponge: 2 eggs, 60g almond flour, 20g all-purpose flour, 60g icing sugar, 2 egg whites, 20g melted butter
- White Chocolate Mousse: 250ml cream, 150ml milk, 3 egg yolks, 50g sugar, 5g gelatin, 100g white chocolate
- Velvet Spray: 150g white chocolate, 75g cocoa butter, white fat-soluble color
- Decoration: Poached pear cubes, chocolate flower decor, lime zest
Step-by-Step Instructions:
- Step 1: Make the Yuzu Curd
In a saucepan, whisk together eggs, yuzu juice, sugar, and cornstarch. Cook gently until thickened. Remove from heat, stir in butter, and chill in a piping bag until needed. - Step 2: Prepare the Pear Compote
Cook diced pear with sugar and lemon juice until soft but not mushy. Add bloomed gelatin and let it dissolve completely. Pour into a small dome or insert mould and freeze. - Step 3: Bake the Almond Sponge
Beat eggs with almond flour and icing sugar until pale. Fold in flour and whipped egg whites. Add butter and spread on tray. Bake at 180°C for 10 minutes. Cut a disc matching the mould base. - Step 4: Prepare White Chocolate Mousse
Heat milk, whisk in yolks and sugar, cook to 82°C. Add gelatin and pour over white chocolate. Once cooled to 30°C, fold in whipped cream for a light mousse texture. - Step 5: Assemble the Entremet
Pipe mousse into the swirl mould halfway. Insert frozen pear compote center. Add more mousse and top with almond sponge. Smooth the surface and freeze overnight. - Step 6: Apply Velvet Spray
Melt cocoa butter and white chocolate, tint with white fat-soluble color, and spray onto the frozen cake for a soft velvety exterior. - Step 7: Garnish with Bloom and Pear
Pipe yuzu curd into the swirl indentation. Garnish with fresh poached pear cubes, edible floral decorations, and a touch of lime zest for a fresh finish.
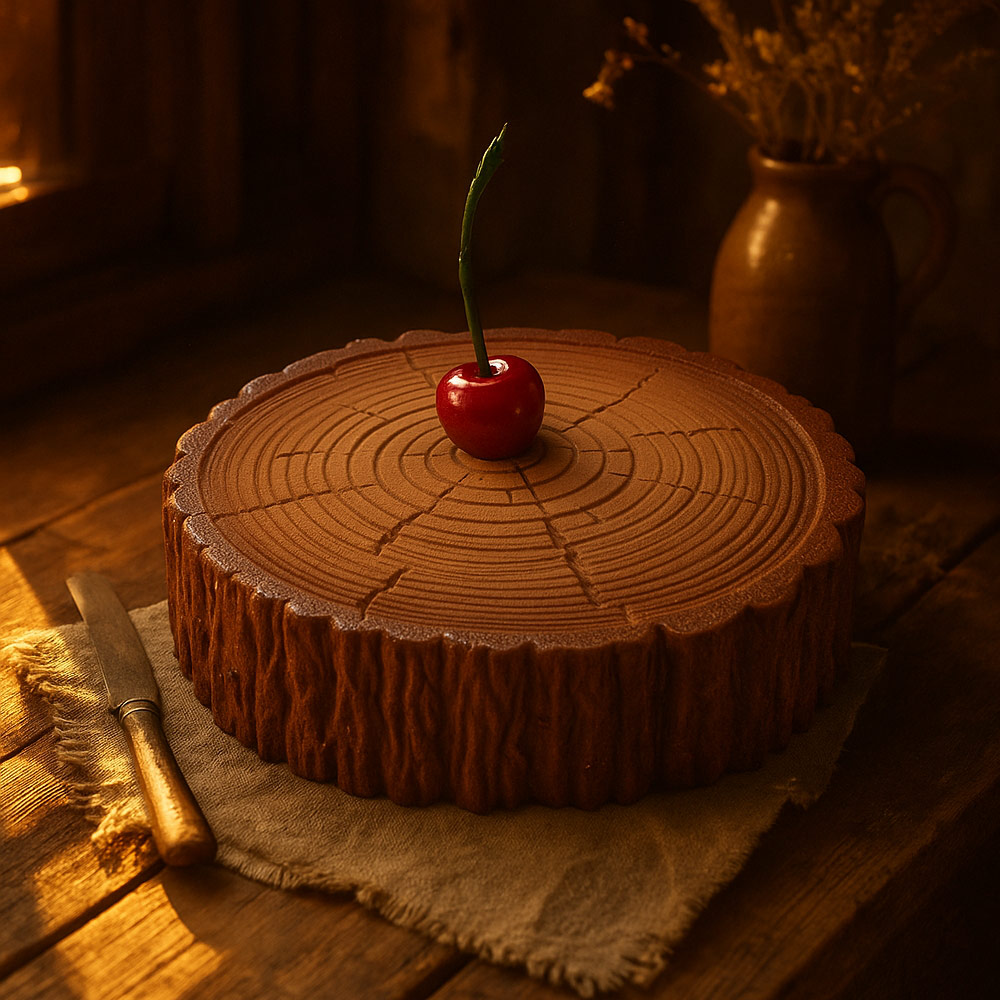
Forest Cherry Wood Entremet Cake
This visually striking entremet is inspired by tree bark and wood rings, featuring layers of dark chocolate mousse, cherry compote, hazelnut crunch, and almond sponge. Its forest aesthetic is completed with a velvet spray and a cherry garnish. Designed for a rustic and elegant dessert presentation, it combines texture, bold flavors, and natural inspiration in every slice.
Ingredients:
- Dark Chocolate Mousse: 150g dark chocolate (70%), 3 egg yolks, 50g sugar, 150ml milk, 250ml whipping cream, 5g gelatin
- Cherry Compote Insert: 150g cherries (pitted), 30g sugar, 2 tsp lemon juice, 3g gelatin
- Hazelnut Crunch Base: 80g praline paste, 30g crushed feuilletine, 50g milk chocolate
- Almond Sponge: 2 eggs, 50g almond flour, 40g sugar, 20g cake flour, 1 tsp vanilla
- Chocolate Velvet Spray: 150g dark chocolate, 75g cocoa butter, brown fat-soluble coloring
- Decoration: Glazed cherry with stem, wood-pattern silicone mould
Step-by-Step Instructions:
- Step 1: Prepare the Cherry Compote
Simmer cherries with sugar and lemon juice until slightly thickened. Blend lightly if desired. Add bloomed gelatin and pour into a small round insert mould. Freeze until firm. - Step 2: Make the Almond Sponge
Beat eggs with sugar until pale and fluffy. Fold in almond flour, cake flour, and vanilla. Spread onto baking tray and bake at 180°C for 10 minutes. Cool and cut to fit base. - Step 3: Prepare Hazelnut Crunch
Melt milk chocolate and mix with praline paste and feuilletine. Spread evenly on top of sponge base and freeze to firm up the layer. - Step 4: Make Dark Chocolate Mousse
Heat milk and whisk with egg yolks and sugar to 82°C. Add gelatin and pour over chopped dark chocolate. Let cool to 30°C and fold in whipped cream until smooth and airy. - Step 5: Assemble the Entremet
Fill the wood-pattern silicone mould halfway with chocolate mousse. Insert frozen cherry compote. Top with more mousse and finish with hazelnut crunch and sponge disc. Freeze overnight. - Step 6: Apply Chocolate Velvet Spray
Melt cocoa butter with dark chocolate and color. Spray over frozen cake to achieve the bark-like velvet finish that complements the wood ring mould. - Step 7: Decorate and Serve
Top the center of the cake with a glazed cherry with stem. Let thaw in refrigerator before serving for clean cuts and rich flavor experience.
Exploring these creative entremet cake recipes reveals how artistry, technique, and flavor can come together to shape truly unforgettable desserts. Whether you're a professional pastry chef or an aspiring baker with a passion for precision, each recipe offers new ways to experiment with textures, design moulds, and flavor combinations. The intricate details, vibrant layers, and thoughtful plating styles can inspire your next signature creation. With the right ingredients and a well-planned workflow, you can turn these ideas into beautifully balanced entremet cakes that make a lasting impression. Let these recipes guide your journey into the world of layered desserts, where every element counts and every bite tells a story.
Choosing the Right Silicone Entremet Mould
Behind every beautiful entremet cake is a mould that makes it possible to achieve the desired design, symmetry, and definition. The right silicone entremet mould can elevate the final presentation, ensure consistent results, and make the demoulding process effortless. While creativity plays a big part in the overall outcome, the choice of mould is the first step in shaping the visual identity of your dessert. From minimal lines and floral contours to futuristic curves and lettered impressions, each mould offers a unique base to start your journey with entremet cake recipes.
When selecting a silicone mould, always consider the final look you want. If the goal is a heart-shaped cake with velvet spray and a clean bow finish, a mould with deep curves and high definition will work best. For layered entremet cake recipes involving inserts, glazes, or multiple textures, a deeper mould with volume variation provides better flexibility. Moulds with removable bottoms or stiff support frames can be especially useful for professional kitchens that need efficiency without compromising quality.
Another important factor is the size and portioning. Individual mini entremet moulds are ideal for tasting menus or plated desserts, while larger family-size silicone moulds are best suited for occasion cakes and birthdays. Investing in durable food-grade platinum silicone moulds ensures flexibility and long-term use without cracks or shape loss. Whether you’re planning to create a rustic-style cherry wood-textured cake or a sleek mirror-glazed ring, the mould you choose plays a vital role in shaping both the exterior finish and internal structure.
Professional pastry chefs also prefer moulds that pair well with decorating tools and accessories like acetate sheets, piping bags, and pastry combs. Compatibility makes the process smoother when building entremet cake recipes that involve multiple freezing and layering steps. With the wide variety available on Bakerykart, chefs and home bakers can explore options that suit both their creative direction and technical needs. Well-designed silicone moulds act as a canvas, allowing you to craft stories in sugar, mousse, and sponge.
How to Layer an Entremet Like a Pro
Layering an entremet cake is a process that blends precision with creativity. Each layer adds depth to the flavour and contributes to the final visual impact. From the base to the finish, every component must be thoughtfully assembled to maintain structure, contrast, and balance. The use of quality ingredients and a professional mould like those from Pavoni makes it easier to achieve consistent results. Below are essential layering techniques used by pastry professionals when crafting refined entremet cake recipes.
- Plan the Structure - Begin by mapping out the sequence of your layers to balance taste and texture. A typical entremet cake recipe starts with a sponge base, followed by a creamy mousse and a fruit or chocolate insert. Planning ensures each bite delivers a complete experience. Flavours like tropical, nutty, or caramel work well with multi-texture layering. Write down your intended stack to visualize flavour flow before you start preparing the components.
- Use Frozen Inserts - Insert layers such as fruit purée, gelée, or ganache should be frozen in advance. This keeps the layers sharp and centered when added into the mousse. Using a frozen insert also ensures it does not dissolve or blend into the surrounding mousse, allowing for a clean cross-section after slicing. Proper temperature control at this stage is crucial to maintaining a professional finish across your entremet cake recipes.
- Build with Moulds - Pour mousse around the frozen insert inside a high-quality entremet mould. This step creates a stable form and even distribution. Silicone moulds from brands like Pavoni are ideal as they help achieve clean edges and smooth surfaces. Tap the mould gently after filling to remove air bubbles. Ensuring uniform mousse thickness helps retain structural integrity when unmoulded and decorated.
- Layer and Freeze - After assembling the mousse and insert, the entire entremet must be frozen overnight. This solidifies the cake and prevents collapse during finishing. Freezing also makes it easier to apply glazes or velvet sprays. The smoothness of the final layer and the clarity of insert placement both depend on complete freezing, so never rush this step in your entremet preparation process.
- Unmould with Care - To unmould cleanly, remove the frozen entremet gently from the silicone mould. Let it sit at room temperature for a few minutes until the surface softens slightly. Avoid touching the top to prevent fingerprint marks. A steady release maintains the defined lines of each layer, which is essential in entremet cake presentation. This step reveals the beauty of your precise layering technique.
- Apply the Finish - Choose your final finish based on the recipe. Mirror glaze adds elegance while velvet spray brings a modern matte texture. Be sure the cake is frozen solid before glazing to prevent melting or dripping. A flawless outer finish highlights the precision of your inner layers and makes your entremet look as impressive as it tastes. Always use chilled tools to work quickly and cleanly.
Perfect layering is what sets apart average cakes from true entremet artistry. It showcases the baker’s skill, attention to detail, and understanding of texture dynamics. With patience and careful execution, you can turn each entremet cake into a visual and culinary masterpiece that reflects your creative identity. Let this process become a signature step in all your entremet cake recipes as you refine your pastry technique.
Common Mistakes to Avoid When Making Entremet
Creating a beautifully layered entremet cake requires technical precision, timing, and an understanding of how ingredients interact through every stage. Even professional chefs can occasionally run into issues that affect the final appearance or texture. Recognising these common pitfalls helps avoid disappointment and ensures each entremet you craft meets high culinary standards. From mousse stability to glaze application, every detail matters in achieving a refined final result that reflects your skill and artistry.
- Skipping Layer Planning - Avoid beginning without a clear visual or written layout of your intended structure. Without planning, you may end up with uneven textures or poorly balanced flavours. Each entremet should offer contrast between creamy, crunchy, soft, and chewy elements. Structuring your components in advance ensures the cake holds its shape and delivers the intended experience. An overlooked layer sequence can lead to confusion during assembly and a less harmonious result.
- Improper Insert Temperature - Placing inserts into mousse without properly freezing them can lead to melting, smearing, or layer distortion. A cold but unfrozen insert may not retain its shape and will ruin the clean cut you expect in a polished entremet. Always freeze inserts thoroughly before layering. This avoids unnecessary blending of colours and flavours that compromise the visual and structural clarity of your dessert.
- Overwhipping the Mousse - While aeration is important, overwhipping cream or mousse bases can create a grainy or unstable texture. It also causes the mousse to deflate once poured into the mould, affecting the overall volume and appearance. Whip only to soft peaks and fold gently for a light yet structured consistency. Smooth mousse ensures a more defined, professional finish across all entremet cake recipes.
- Neglecting Freezing Time - Trying to glaze or demould too early is one of the most frequent causes of failure. Entremets need full overnight freezing to stabilize internal layers and allow clean release from moulds. Rushing this process often results in broken edges, melting mousse, or smudged glaze finishes. Allocate sufficient time to freeze and always test firmness before removing from the silicone mould.
- Glazing on Warm Surface - Applying a mirror glaze or velvet spray to a partially thawed or warm entremet will create dull patches, streaks, or melting. Always confirm the surface is frozen solid before glazing. Cold surfaces ensure the glaze sets instantly and maintains its shine. Glazing too soon also leads to uneven coverage and diminished visual impact, especially on multi-textured or multi-coloured recipes.
- Touching Finished Surfaces - Even slight contact with fingers or tools after glazing can leave marks or smudges that are difficult to correct. Use cold spatulas or tweezers when handling garnishes or repositioning your dessert. Wearing gloves can help protect the finish and keep presentation flawless. Fingerprints or smears can diminish the beauty of your entremet and take away from the layered precision within.
Understanding these challenges allows you to anticipate problems and refine your approach in every bake. Precision, patience, and proper timing are the true ingredients behind a successful entremet cake. With practice and a thoughtful workflow, you can consistently produce visually captivating and technically accurate entremets that delight both the eye and the palate. Let each mistake become a learning step toward achieving dessert mastery.
Why Entremet Cake is Trending Among Millennial and Gen Z Chefs
The culinary world has seen a dramatic shift in how young chefs approach dessert innovation, driven by aesthetics, flavour experimentation, and digital exposure. Millennial and Gen Z bakers are turning to the entremet cake not only as a technical challenge but also as a platform for visual storytelling. Unlike traditional desserts that follow familiar forms, these intricate creations offer endless ways to mix bold colours, layers, and garnishes that appeal to both creativity and social media attention.
- Social Media Appeal - The visual beauty of mirror glazes, vibrant inserts, and geometric moulds captures immediate attention online. Chefs are using the entremet format to showcase detailed creations that stand out in a fast-scrolling digital environment. Each layer becomes a story that translates beautifully into reels and photos. This format perfectly matches the aesthetic goals of Gen Z creators focused on engagement and uniqueness.
- Creative Flavour Fusion - Millennial bakers are known for breaking boundaries in taste, merging global influences with traditional bases. Entremets offer the structure and flexibility to combine Asian fruit inserts, European mousse techniques, and modern pastry elements in one refined dessert. Young chefs use the form to balance both art and taste, constantly evolving their flavour profiles with confidence.
- Access to Tools -
Related Blog to Follow
Are you still looking for more interesting tips and idea on baking, lovely just follow our blog.
-

24-06-2023
Celebrate Love and Togetherness: Festival Hampers for All Occasions
Express your love and celebrate special occasions with our festival hampers, filled with delightful treats and thoughtful gifts.
View Detail -

01-10-2019
Polymorphs of Chocolate – Why Chocolate needs to be Tempered?
Cocoa butter is the primary ingredient in chocolate, which is composed mainly of fat molecules. It is the arrangement of these fat molecules that determines the structure of chocolate
View Detail -

18-07-2025
Easy Callebaut Dark Chocolate Recipes Anyone Can Make
Discover 10 beginner-friendly Callebaut dark chocolate recipes perfect for non-bakers, featuring easy methods, few ingredients, and rich chocolate flavor.
View Detail
-