


How to Clean a Stand Mixer: A Complete Step by Step Guide
10-08-2026
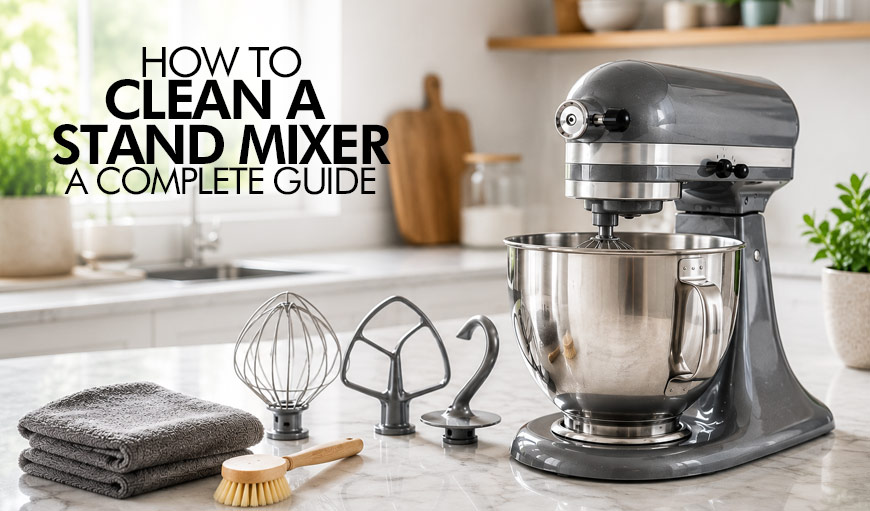
A stand mixer is one of the most useful appliances in a baker’s kitchen, handling everything from cake batters and cookie dough to bread dough, whipped cream and frostings. Learning how to clean a stand mixer properly is essential because flour, butter, sugar, chocolate and batter can gradually collect around the bowl, attachments and less visible parts of the machine.
Regular stand mixer cleaning involves more than washing the mixing bowl and beater after baking. Fine flour can settle around controls and ventilation areas, while splashes of batter or frosting may reach the underside of the mixer head, planetary assembly, beater shaft and bowl mounting area. If these areas are overlooked, residue can dry and become increasingly difficult to remove.
This step by step guide explains how to clean the bowl, attachments, mixer body, planetary area, attachment hub, controls, base and other accessible areas safely. It also covers routine cleaning, periodic deep cleaning and common mistakes to avoid, helping you keep your stand mixer clean, hygienic and ready for your next baking project.
Why Regular Stand Mixer Cleaning Matters?
A stand mixer regularly comes into contact with flour, butter, sugar, chocolate, cream, dough and cake batter. Even when the bowl and attachments look clean after washing, small amounts of ingredients can remain around the mixer head, beater shaft, planetary area, controls and bowl mounting surface. Over time, this residue can dry, attract more dust and become increasingly difficult to remove.
Regular stand mixer cleaning helps keep the appliance hygienic, presentable and ready for your next baking session. Paying attention to both visible surfaces and commonly overlooked areas also makes periodic deep cleaning much easier.
Key benefits of cleaning your stand mixer regularly include:
- Better hygiene: Removes batter, grease, flour and other food residue from frequently used areas.
- Less stubborn buildup: Fresh spills and splashes are considerably easier to clean before they dry onto the mixer.
- Cleaner attachments: Regularly cleaning the whisk, beater, dough hook and bowl prevents leftover ingredients from contaminating your next recipe.
- Well maintained appearance: Removing fingerprints, flour dust, chocolate and grease helps preserve the mixer’s exterior finish.
- Easier deep cleaning: Regular wiping prevents excessive residue from accumulating around the planetary assembly, beater shaft, controls and bowl mounting area.
- Ready for the next bake: A clean bowl, attachment and mixer allow you to start your next recipe without dealing with residue from the previous baking session.
A simple cleaning routine after each use can therefore save considerable effort later while keeping your stand mixer clean and properly maintained.
What You Need to Clean a Stand Mixer?
Before learning how to clean a stand mixer thoroughly, keep the right cleaning supplies within reach. Stand mixers have painted or polished exterior surfaces, narrow gaps, attachment points and electrical components, so gentle cleaning tools are generally preferable to abrasive scrubbers or harsh cleaning products.
For routine cleaning and occasional deep cleaning, keep the following items ready:
- Microfiber cloth: Use a soft microfiber cloth to wipe flour, fingerprints, grease and food splashes from the mixer body and other accessible exterior surfaces.
- Soft sponge: A non abrasive sponge is useful for cleaning removable components such as the mixing bowl, provided it is suitable for the material and finish.
- Mild dishwashing liquid: Use a small amount with warm water when washing suitable removable bowls and attachments.
- Soft cleaning brush: A small brush helps loosen dry flour and crumbs around the planetary area, bowl mounting surface and other accessible exterior crevices.
- Soft toothbrush: Useful for carefully reaching narrow exterior areas where dried ingredients may accumulate.
- Cotton swabs: These can help clean small accessible exterior gaps around controls and seams without introducing excessive moisture.
- Dry lint free cloth: Keep one available for drying cleaned surfaces and removing any remaining moisture.
Steps to Take Before Cleaning Your Stand Mixer
Before beginning the cleaning process, prepare the stand mixer carefully to protect its electrical and mechanical components. At this stage, do not remove the bowl or attachments, as these will be covered separately in Step 1.
Take these precautions before cleaning:
- Switch off and unplug the mixer: Set the speed control to the off position and disconnect the power plug from the electrical socket. Never clean or inspect the mixer while it is connected to power.
- Wait for the mixer to stop completely: Make sure the planetary mechanism, beater shaft and installed attachment are no longer moving before proceeding.
- Allow the mixer to cool: If the stand mixer has been used continuously for an extended period, allow the motor housing to cool before cleaning.
- Clear the surrounding workspace: Remove ingredients, mixing utensils, open flour bags and other baking supplies from around the appliance. A clean, dry countertop provides sufficient space to work safely.
- Keep liquids away from the appliance: Never pour or spray water, detergent or cleaning solution directly onto the stand mixer. Moisture should not enter the motor housing, controls, ventilation openings or attachment hub.
- Review the manufacturer's care instructions: Different stand mixer models may have specific cleaning requirements. Checking the appliance manual before deep cleaning can help prevent damage to finishes, components and mechanisms.
With these precautions completed, the stand mixer is ready for Step 1, removing the bowl and attachments before the detailed cleaning process begins.
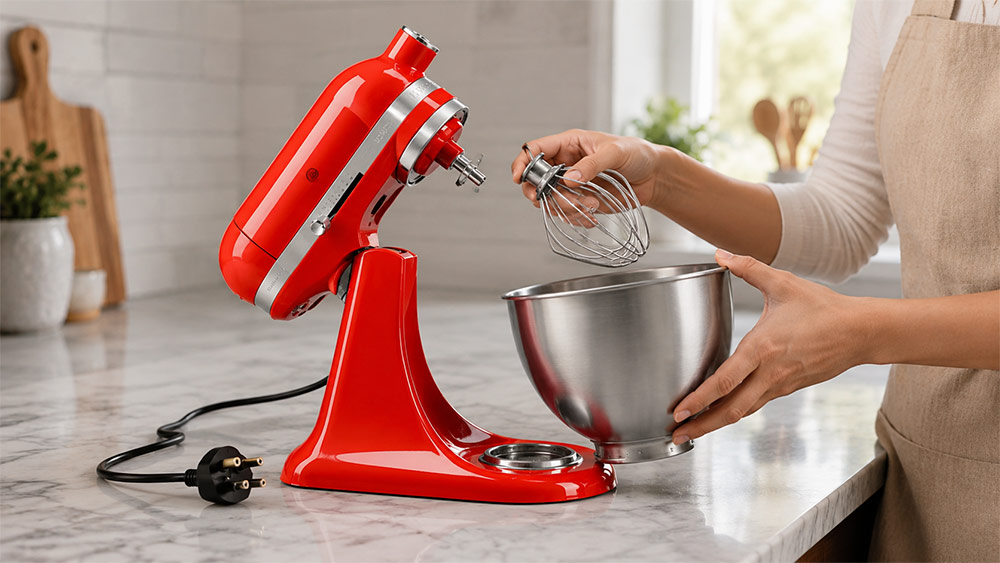
Step 1: Remove the Bowl and Stand Mixer Attachments
Once the stand mixer is switched off, unplugged and prepared for cleaning, begin by removing all detachable components. Separating the bowl and attachments gives you better access to areas where flour, batter and other ingredients commonly collect while also allowing each removable component to be cleaned correctly.
Remove the components carefully rather than forcing them from their mounting points:
- Remove the mixing bowl: Unlock and lift or twist the bowl away from its mounting position according to your stand mixer design. Bowl lift models may use support arms, while tilt head models commonly secure the bowl directly to the base.
- Remove the installed attachment: Detach the flat beater, wire whisk, dough hook or flex edge beater from the beater shaft. Check the connection point for any batter or dough that may have collected around it.
- Remove optional accessories: If you have used an accessory through the attachment hub, remove it according to the manufacturer's instructions and keep it separately for cleaning.
- Inspect each component: Check the bowl and attachments for dried batter, dough, butter, chocolate, frosting or other residue. Pay particular attention to attachment joints, whisk wires and narrow areas where ingredients can remain trapped.
- Check the cleaning instructions: Do not automatically place every mixer attachment in the dishwasher. Material, coating and construction vary between products, so always follow the manufacturer's recommended cleaning method.
Keeping the bowl and attachments separate also makes it easier to access the mixer base, planetary area and underside of the mixer head during the later stages of stand mixer cleaning.
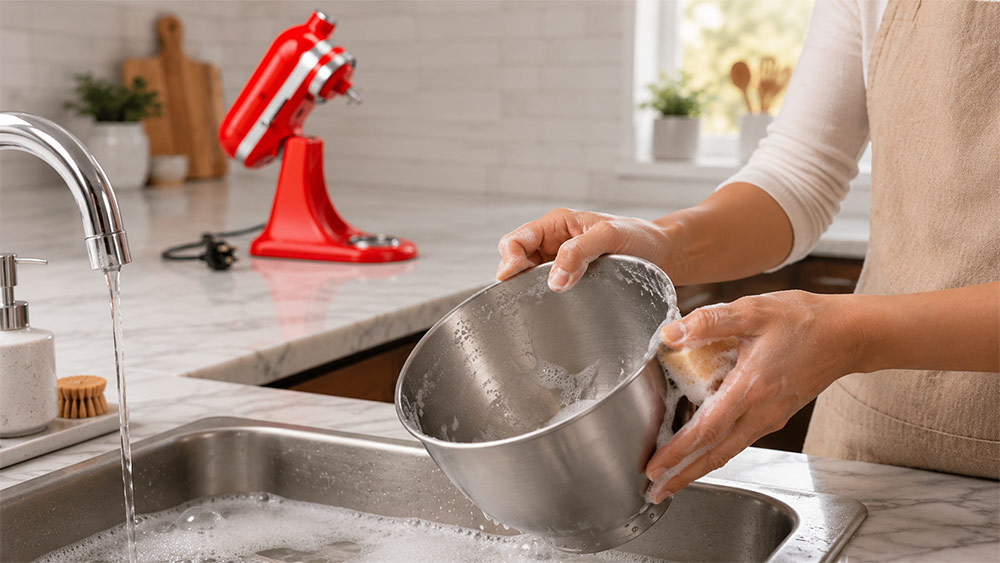
Step 2: Clean the Stand Mixer Bowl
The mixing bowl comes into direct contact with almost every recipe prepared in your stand mixer, from cake batter and cookie dough to bread dough, whipped cream, buttercream and melted chocolate. Cleaning it thoroughly after every use prevents food residue, grease and odours from remaining on the surface.
For effective stand mixer cleaning, wash the bowl separately after removing it from the appliance. Always check the manufacturer's care instructions first, particularly before placing a bowl in the dishwasher, as cleaning recommendations can vary according to its material and finish.
Follow these steps to clean the stand mixer bowl:
- Remove loose ingredients: Scrape out remaining dough, batter, frosting or cream using a soft silicone or plastic spatula. Avoid sharp tools that could scratch the surface.
- Wash with warm soapy water: Use mild dishwashing liquid, warm water and a soft, non abrasive sponge to clean the inside and outside of the bowl.
- Pay attention to the rim and base: Batter and flour can collect underneath the rim and around the bowl's mounting area. Clean these sections carefully rather than focusing only on the interior.
- Soften dried residue: If dough, chocolate or batter has dried onto a suitable washable bowl, allow it to soak in warm soapy water before gently wiping the residue away.
- Rinse thoroughly: Remove all traces of dishwashing liquid and loosened food particles with clean water.
- Dry completely: Use a clean lint free cloth or allow the bowl to air dry completely before reinstalling it on the stand mixer.
Removing Stubborn Residue from the Mixer Bowl
Sticky dough, buttercream, chocolate and high fat mixtures can sometimes leave a thin film behind even after washing. Instead of using an abrasive scrubber, repeat the warm water and mild detergent cleaning process with a soft sponge. For stubborn residue, follow the cleaning recommendations specified by the bowl manufacturer.
A thoroughly cleaned and completely dry bowl provides a clean surface for your next recipe and prevents leftover flavours or ingredients from affecting subsequent baking preparations.
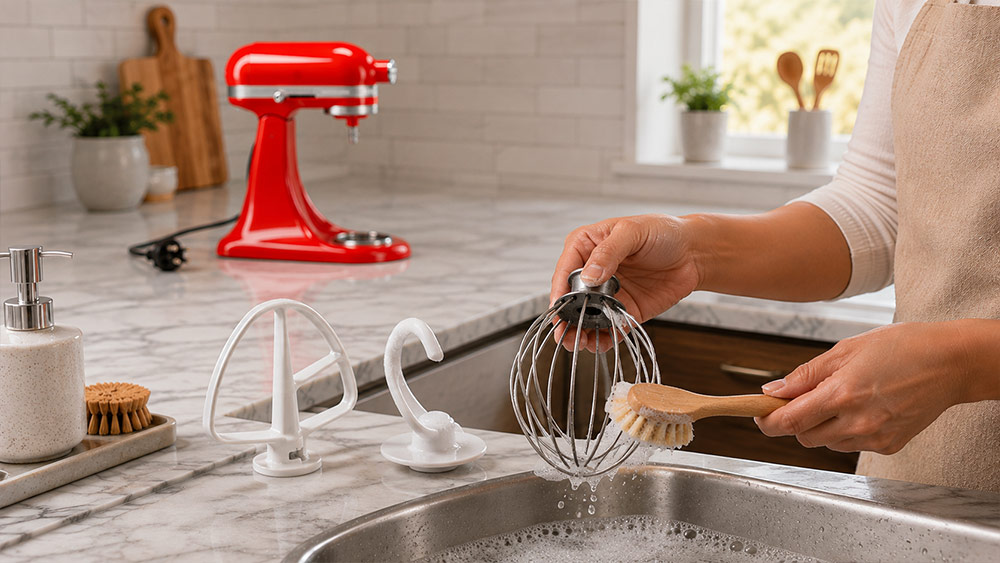
Step 3: Clean the Beater, Dough Hook and Wire Whisk
Stand mixer attachments come into direct contact with cake batter, cookie dough, bread dough, cream, frosting and other ingredients, making thorough cleaning essential after every use. Residue can remain around connection points, between whisk wires and along the curves of dough hooks even when an attachment appears clean at first glance.
When learning how to clean a stand mixer, it is important to treat each attachment according to its material and finish. Some attachments may be dishwasher safe, while coated, burnished or speciality attachments may require hand washing. Always follow the manufacturer's care instructions for your specific attachment.
Clean each attachment carefully:
- Flat beater: Remove batter from the edges, openings and attachment collar. Wash suitable beaters using warm water, mild dishwashing liquid and a soft sponge.
- Dough hook: Check the entire curved surface and connection point for sticky or dried dough. Soften stubborn residue with warm water where permitted before gently cleaning it away.
- Wire whisk: Pay particular attention to spaces between the wires where cream, egg whites and batter can remain trapped. Use a soft brush or sponge to reach these narrow areas without bending the wires.
- Flex edge and speciality beaters: Clean the flexible edges, joints and grooves carefully according to the manufacturer's instructions, as food residue can collect along these areas.
After washing, rinse each attachment thoroughly and dry it completely before storing or reconnecting it to the mixer. Avoid reinstalling damp attachments, particularly when moisture could remain around the attachment connection point.
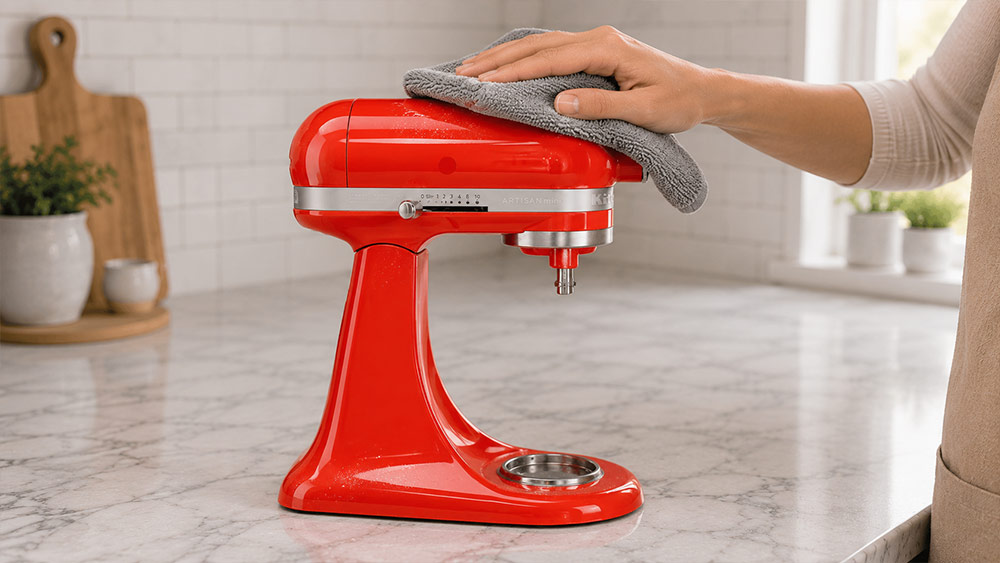
Step 4: Clean the Stand Mixer Body
Once the bowl and attachments are being cleaned separately, turn your attention to the main mixer body. Flour dust, icing sugar, cocoa powder, butter, chocolate and small batter splashes can settle on the exterior during mixing. These marks are easier to remove immediately rather than after they have dried onto the surface.
As part of regular stand mixer cleaning, use a soft microfiber cloth that is only slightly damp. Never spray water, detergent or cleaning solution directly onto the appliance, as liquid can enter the controls, ventilation openings, attachment hub or motor housing.
Clean the exterior systematically:
- Start at the top: Wipe the upper surface of the mixer head where fine flour and dust commonly settle.
- Clean the sides and front: Gently remove fingerprints, grease and ingredient splashes using the slightly damp microfiber cloth.
- Wipe the rear housing: Clean accessible exterior surfaces carefully while keeping moisture away from ventilation openings.
- Clean the neck and column: On applicable models, wipe around the mixer neck, column and other accessible structural areas where flour can accumulate.
- Pay attention to seams: Use a dry, soft brush to loosen flour trapped along accessible exterior seams before wiping the surrounding surface.
- Dry the exterior: Finish with a clean, dry lint free cloth to remove remaining moisture and leave the surface clean.
Avoid abrasive pads, metal scrubbers and aggressive cleaning products unless specifically approved by the manufacturer. These may scratch painted, polished or coated surfaces and gradually affect the finish of your stand mixer.
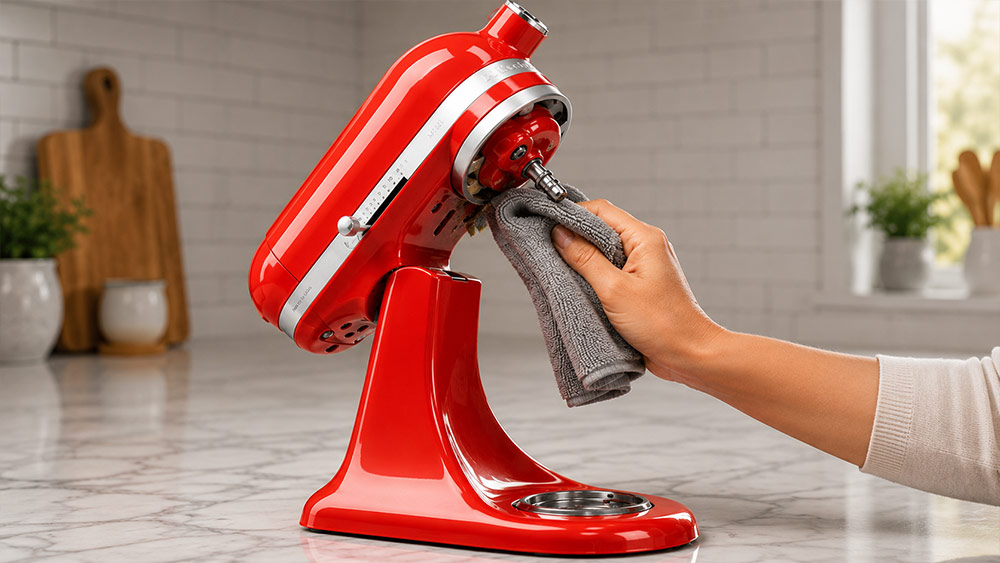
Step 5: Clean Underneath the Stand Mixer Head
The underside of the mixer head is one of the easiest areas to overlook during routine cleaning. While mixing cake batter, buttercream, whipped cream or dough, small splashes can reach underneath the head and collect around the housing near the planetary mechanism. Fine flour and icing sugar can also settle in these areas over repeated baking sessions.
For a thorough stand mixer cleaning, inspect the underside whenever you remove the bowl and attachment. On a tilt head model, raise and secure the mixer head according to the manufacturer's instructions. For a bowl lift mixer, access the underside without forcing or repositioning parts that are not designed to move.
Focus on these areas:
- Underside of the mixer head: Use a slightly damp microfiber cloth to remove visible batter, grease and ingredient splashes from accessible surfaces.
- Area surrounding the planetary assembly: Carefully wipe the exterior surface around the mechanism without forcing the cloth into moving parts or openings.
- Around the beater shaft: Remove visible food residue from the accessible area surrounding the shaft. Detailed cleaning of the planetary mechanism and shaft will be covered in the next step.
- Edges and exterior seams: Use a small, dry soft brush to loosen flour or icing sugar from accessible narrow areas before wiping the surrounding surface.
- Finish with a dry cloth: Remove any remaining surface moisture before proceeding to the next cleaning area.
Do not spray cleaner directly underneath the mixer head or allow water to run into seams, openings or mechanical components. A controlled amount of moisture on the cloth is sufficient for cleaning most exterior food splashes.
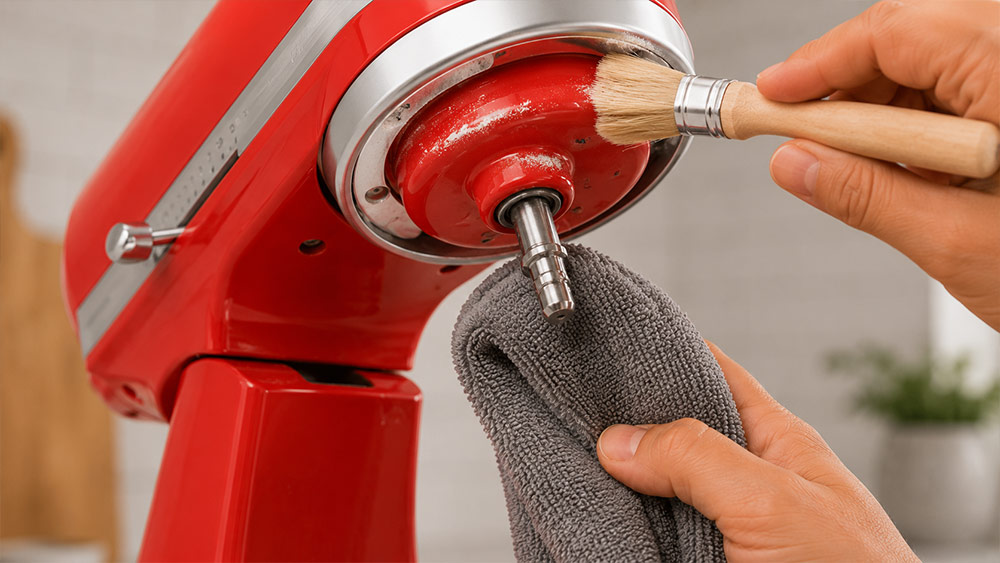
Step 6: Clean the Planetary Assembly and Beater Shaft
The planetary assembly and beater shaft are among the most important areas to inspect when you deep clean a stand mixer. Located underneath the mixer head, these components sit directly above the mixing bowl and can gradually collect fine flour, cake batter, buttercream, chocolate and other ingredients during regular baking.
Because the planetary assembly is part of the mixer's mechanical system, it requires careful cleaning. The objective is to remove residue from accessible exterior surfaces without introducing water or cleaning products into the mechanism.
Follow these steps:
- Remove loose flour first: Use a clean, dry soft brush to gently loosen flour, icing sugar and dry crumbs around the accessible edges of the planetary assembly.
- Clean around the planetary area: Use a slightly damp microfiber cloth to wipe visible batter, grease and ingredient residue from the exterior surface surrounding the mechanism.
- Wipe the beater shaft: Carefully clean the exposed shaft where the beater, whisk or dough hook connects. Pay attention to residue around the attachment connection point.
- Check narrow exterior areas: A soft toothbrush or small detailing brush can help remove dry residue from accessible edges that cannot be reached easily with a cloth.
- Dry the area completely: Finish with a clean, dry lint free cloth and ensure no moisture remains around the shaft or planetary assembly.
Never pour or spray cleaning liquid onto the planetary mechanism. Avoid inserting wet cotton swabs, brushes or other objects inside mechanical openings. If you notice unusual grease leakage, excessive movement, mechanical damage or a problem that requires dismantling the mixer, refer to the manufacturer's service instructions rather than attempting to disassemble the mechanism during routine cleaning.
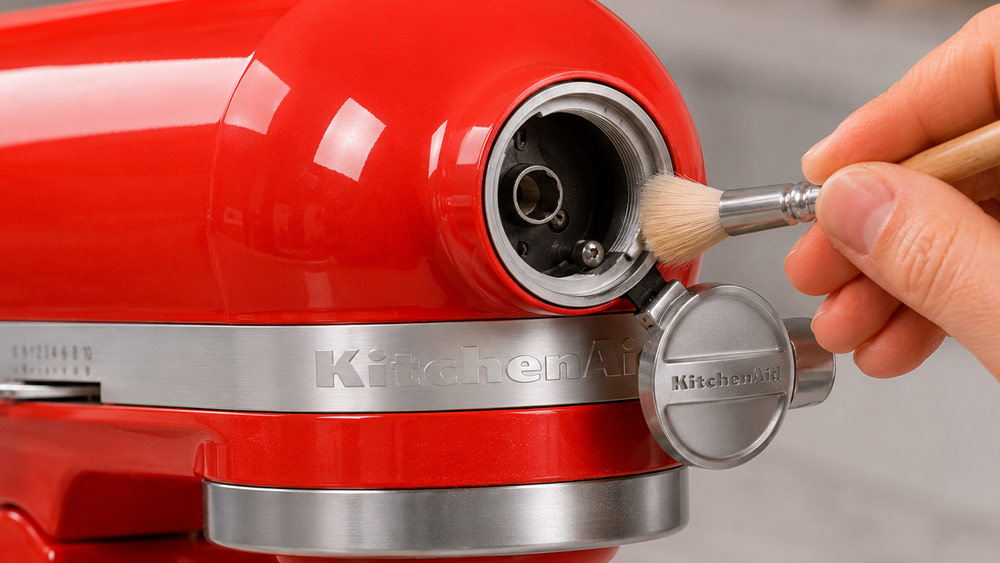
Step 7: Clean the Stand Mixer Attachment Hub
The attachment hub is located at the front of many stand mixers and is designed to connect compatible accessories such as pasta makers, food grinders and other attachments. Even when the hub is not regularly used, fine flour, icing sugar and kitchen dust can collect around the hub cover, screw and surrounding exterior surface.
When following a complete how to clean a stand mixer routine, this small area deserves attention. However, because the hub connects directly to the mixer’s internal mechanism, cleaning should remain limited to accessible surfaces unless the manufacturer specifically recommends otherwise.
Clean the attachment hub carefully:
- Clean around the hub cover: Use a dry microfiber cloth or soft detailing brush to remove loose flour and dust from around the cover and surrounding surface.
- Remove the cover only when appropriate: If your mixer allows the attachment hub cover to be removed, follow the manufacturer's instructions. Do not force the cover or retaining screw.
- Wipe accessible surfaces: Use a barely damp microfiber cloth to remove fingerprints, grease or dried ingredient residue from the exterior rim and cover.
- Clean around the retaining screw: A small dry brush can help remove flour from around the screw and other narrow exterior areas.
- Keep the opening dry: Never spray cleaning solution into the attachment hub or insert a wet cloth, cotton swab or brush deep inside the opening.
Once cleaned, dry the surrounding area thoroughly and reinstall the hub cover correctly. If an accessory was recently used, clean that attachment separately according to its specific care instructions before storing it.
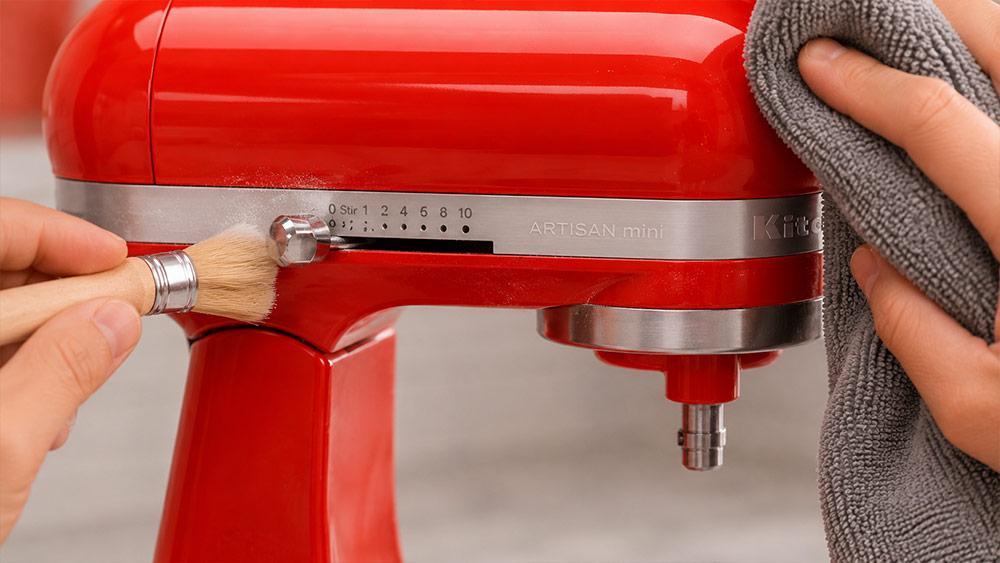
Step 8: Clean Around the Speed Control and Switches
Flour and icing sugar can travel surprisingly far during mixing, especially when dry ingredients are added too quickly or the mixer starts at a higher speed. Fine particles may settle around the speed control, switches and other exterior controls. Fingerprints, butter and batter splashes can also leave residue in these frequently touched areas.
As part of regular stand mixer maintenance, controls should be cleaned carefully because they are positioned close to electrical components. The aim is to remove surface residue without allowing moisture or cleaning products to enter gaps around the switches.
Follow these steps:
- Remove dry flour first: Use a clean, dry soft detailing brush to gently loosen flour, icing sugar and other dry particles from around the speed control.
- Wipe the surrounding surface: Use a soft microfiber cloth that is only slightly damp to remove fingerprints, grease and visible food splashes.
- Clean narrow exterior edges carefully: Use the corner of a dry microfiber cloth or a small soft brush for accessible gaps around the control.
- Avoid spraying cleaning products: Never spray water, detergent or cleaning solution directly onto the speed control, switches or surrounding housing.
- Dry the area thoroughly: Finish with a clean, dry lint free cloth and ensure the controls and surrounding surfaces are completely dry before the mixer is eventually reconnected to power.
Avoid pushing cotton swabs, brushes or other cleaning tools deep inside switch openings. If flour or food residue appears to have entered an inaccessible electrical area, follow the manufacturer's service recommendations rather than attempting to open the mixer yourself.
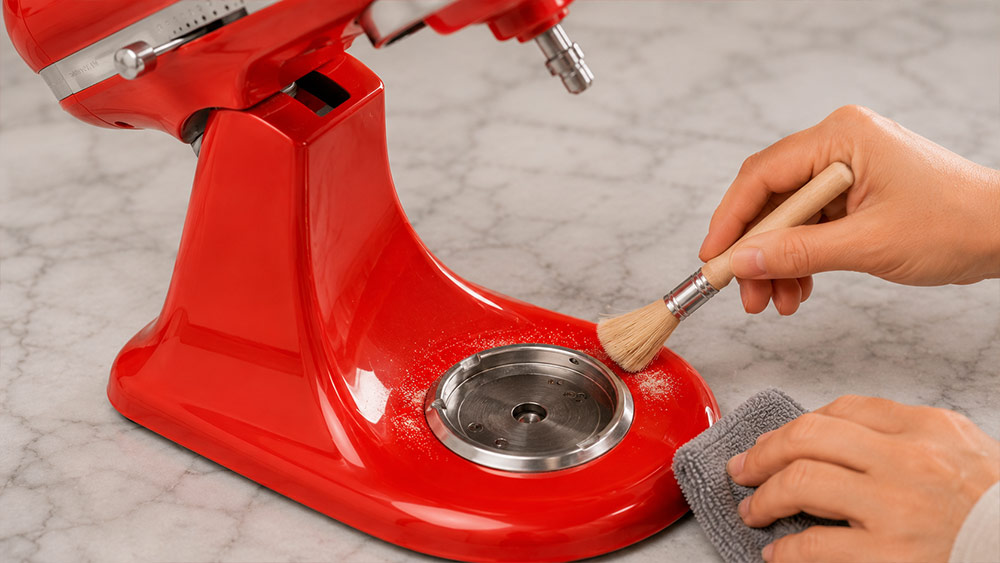
Step 9: Clean the Base and Bowl Mounting Area
The base of a stand mixer can collect more baking residue than it appears to. Flour, icing sugar, cocoa powder, crumbs and small drops of batter can fall around or underneath the mixing bowl during ingredient addition. If these particles are not removed regularly, they may accumulate around the bowl mounting area, base edges and other difficult to reach surfaces.
This part of stand mixer cleaning differs slightly between tilt head and bowl lift models. Tilt head mixers commonly have a bowl mounting plate on the base, while bowl lift mixers use support arms and locating points to hold the bowl securely.
Pay attention to the following areas:
- Remove loose ingredients first: Use a clean, dry soft brush to sweep away flour, sugar, crumbs and other dry particles before wiping the surface.
- Clean the bowl mounting plate: On a tilt head mixer, wipe around the plate and accessible grooves where the bowl locks into position. Pay particular attention to dried batter around the edges.
- Clean bowl support arms: On bowl lift models, carefully wipe the support arms, locating pins and accessible surfaces where the bowl sits.
- Wipe the mixer base: Use a slightly damp microfiber cloth to remove grease, fingerprints and food splashes from the exposed base.
- Check underneath the base edges: Flour and crumbs can collect close to the mixer feet and countertop. Move the unplugged mixer only when necessary and according to the manufacturer's handling recommendations.
- Dry before reinstalling the bowl: Finish with a clean, dry lint free cloth and ensure the mounting area is completely dry.
Keeping this area clean not only improves overall hygiene but also prevents old flour and food residue from remaining underneath a freshly cleaned mixing bowl.
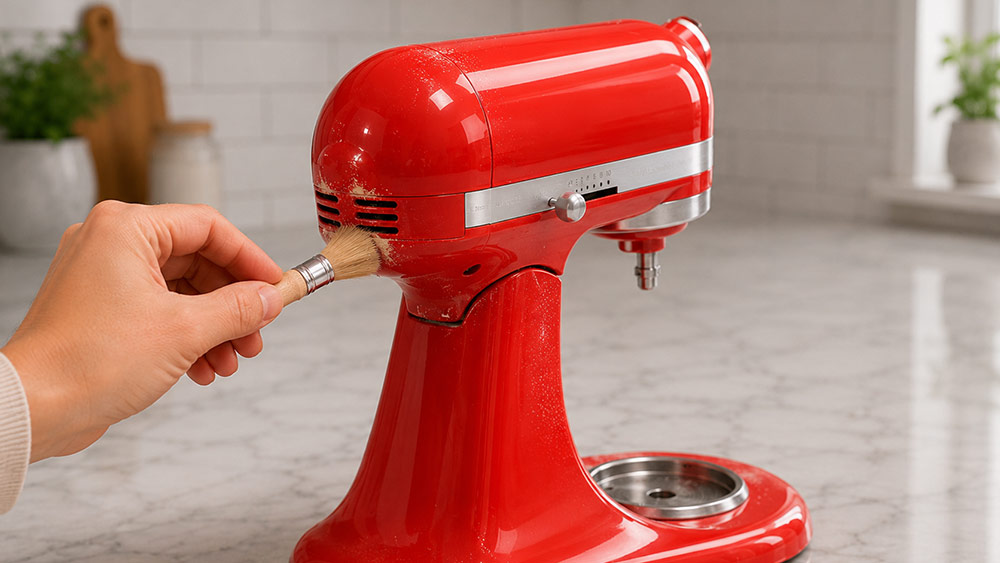
Step 10: Clean the Ventilation Openings and Hard to Reach Areas
Ventilation openings help release heat generated while the stand mixer is operating. Over time, fine flour, icing sugar, cocoa powder and ordinary kitchen dust can settle around the exterior of these vents. Because the openings lead toward internal components, they require a different cleaning approach from the main mixer body.
When learning how to clean a stand mixer thoroughly, ventilation areas should be inspected periodically, particularly if you bake frequently with flour or other fine dry ingredients.
Clean these areas carefully:
- Use a dry soft brush: Gently loosen visible flour and dust from the exterior surface of the ventilation openings. Work carefully so you do not push debris further inside.
- Clean around the vents: Wipe the surrounding housing with a dry microfiber cloth. If necessary, use a barely damp cloth on the solid exterior surface while keeping the actual openings dry.
- Check exterior seams and crevices: Inspect accessible joints around the mixer body where flour may settle. A small soft detailing brush can help loosen dry particles from these narrow areas.
- Avoid inserting cleaning tools: Do not push brushes, cotton swabs, cloths or other objects deep into ventilation openings or inaccessible gaps.
- Never apply liquid to the vents: Water and cleaning solutions should not be sprayed or poured near ventilation openings because moisture may reach internal electrical components.
Keeping the exterior ventilation areas free from visible flour and dust should form part of periodic stand mixer maintenance. If significant debris appears to be trapped inside the appliance, consult the manufacturer's service recommendations instead of dismantling the mixer for routine cleaning.
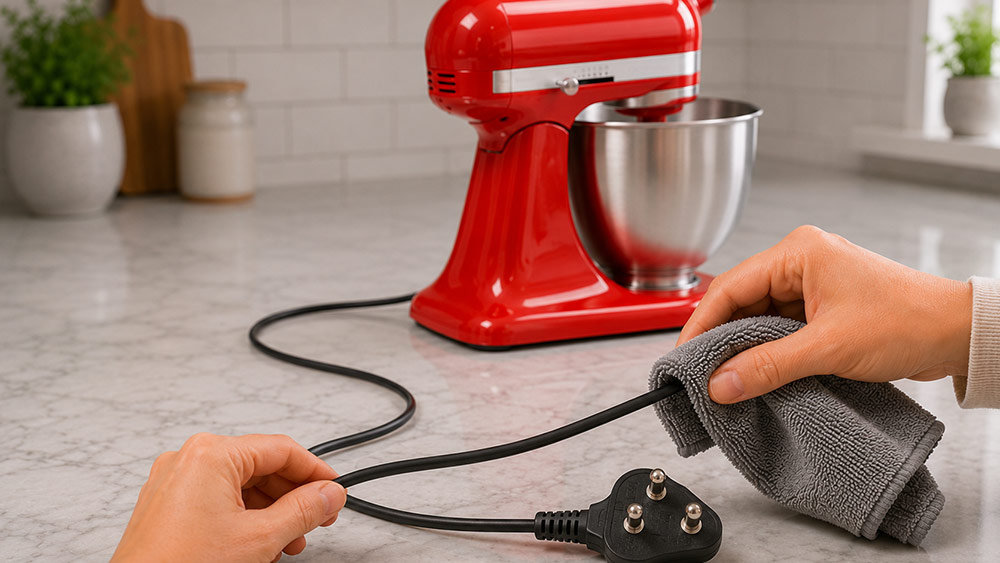
Step 11: Clean the Power Cord and Plug
The power cord is easy to overlook when cleaning a stand mixer, but it can collect flour, grease, dust and ingredient splashes, particularly when the appliance remains permanently positioned on a kitchen countertop. Keeping the cord clean should therefore be included in periodic stand mixer cleaning and maintenance.
Since the cord and plug are electrical components, they should always be handled carefully and kept away from excessive moisture.
Follow these steps:
- Confirm the mixer is unplugged: The power plug must remain completely disconnected from the electrical socket throughout the cleaning process.
- Inspect the cord first: Check for visible cracks, cuts, exposed wiring or other signs of damage. If damage is found, stop using the appliance and follow the manufacturer's service recommendations.
- Wipe the cord carefully: Use a soft microfiber cloth that is only slightly damp to remove flour, grease and surface dirt along the cable.
- Keep the plug dry: Never immerse the plug in water or allow cleaning liquid to enter around its pins or electrical connections. A clean, dry cloth is generally suitable for removing exterior dust.
- Dry before reconnecting: Allow the cord and surrounding areas to dry completely before plugging the stand mixer back into the electrical socket.
Avoid pulling, twisting or tightly wrapping the power cord while cleaning or storing the mixer. Proper handling helps protect the cable and keeps the appliance ready for regular baking use.
Step 12: Dry and Reassemble Your Stand Mixer
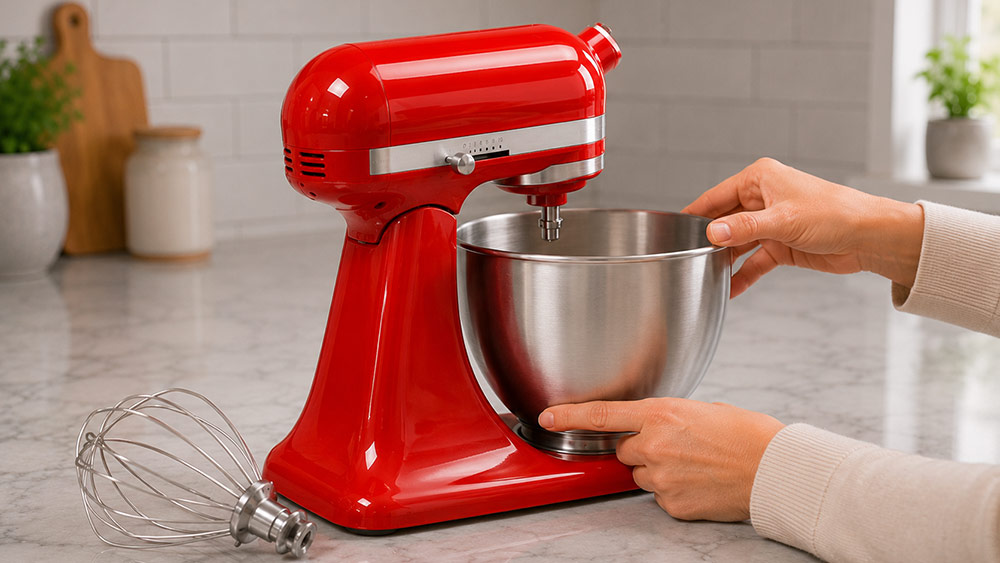
After cleaning the bowl, attachments, mixer body and accessible areas, allow every component to dry completely before reassembling the appliance. This final step is important because moisture should not remain around attachment connection points, the bowl mounting area, controls or other mechanical and electrical components.
Before considering your stand mixer cleaning complete, inspect each component and reassemble the mixer carefully:
- Dry the mixing bowl completely: Check the inside, outside, rim and mounting base for remaining water droplets before placing it back on the mixer.
- Check every attachment: Make sure the flat beater, dough hook, wire whisk and other cleaned accessories are completely dry, particularly around their connection points and narrow joints.
- Inspect the mixer body: Ensure the underside of the mixer head, planetary area, attachment hub, controls, base and other cleaned exterior surfaces are dry.
- Reinstall the bowl: Secure the clean bowl correctly onto the mounting plate or bowl support mechanism according to your mixer design.
- Attach only what you need: Reinstall the appropriate clean and dry attachment if the mixer will be used immediately. Otherwise, store attachments separately in a clean, dry location.
- Reconnect power only when completely dry: Plug the stand mixer back into the electrical socket only after confirming that the appliance, power cord, plug and all cleaned areas are completely dry.
Once reassembled, give the mixer a final visual inspection for any remaining flour, fingerprints or food residue. Your stand mixer should now be clean, dry and ready for the next batch of cakes, cookies, bread or other baked creations.
How Often Should You Clean a Stand Mixer?
How often you clean your stand mixer depends on how frequently you bake and the ingredients you use. A mixer used occasionally for cake batter may require less frequent deep cleaning than one regularly exposed to bread dough, buttercream, chocolate, icing sugar and large quantities of flour.
A practical stand mixer cleaning schedule can help prevent residue from accumulating in overlooked areas:
- After every use: Wash the mixing bowl and used attachments, then wipe away visible batter, flour, grease or ingredient splashes from the mixer body and accessible surfaces.
- After messy baking sessions: Check underneath the mixer head, around the planetary assembly, beater shaft and bowl mounting area. Recipes involving flour, icing sugar, chocolate or buttercream can leave residue beyond the bowl.
- Weekly for frequent bakers: Inspect and clean the mixer body, base, controls, bowl mounting area and accessible exterior seams. If you bake only occasionally, these areas can be checked after several uses instead.
- Periodically deep clean: Inspect the planetary area, attachment hub, ventilation openings, power cord and other hard to reach exterior areas for accumulated flour, grease or dust.
There is no single cleaning frequency suitable for every baker. The best approach is to clean food contact components after every use and inspect the rest of the stand mixer regularly. Removing fresh residue immediately is considerably easier than dealing with dried batter, hardened dough or layers of flour later.
Common Stand Mixer Cleaning Mistakes to Avoid
Knowing how to clean a stand mixer also means understanding what not to do. Stand mixers combine food contact components with electrical and mechanical parts, so incorrect cleaning methods can damage the finish, allow moisture into sensitive areas or affect removable attachments.
Avoid these common mistakes when cleaning your stand mixer:
- Cleaning while the mixer is plugged in: Always switch off and disconnect the appliance from the electrical socket before cleaning.
- Spraying cleaner directly onto the mixer: Apply moisture to the cleaning cloth rather than spraying water or cleaning solution onto the appliance.
- Using excessive water: Keep moisture away from the speed controls, attachment hub, ventilation openings, motor housing and other electrical or mechanical openings.
- Using abrasive scrubbers: Metal scourers and rough cleaning pads can scratch painted, coated and polished surfaces. Use soft microfiber cloths and non abrasive sponges instead.
- Scraping dried batter aggressively: Avoid knives or sharp utensils. Soften residue on suitable removable components and clean it gently with an appropriate sponge or brush.
- Assuming every attachment is dishwasher safe: Beaters, whisks and dough hooks can have different materials and finishes. Always check the manufacturer's care instructions before using a dishwasher.
- Forgetting hidden areas: The underside of the mixer head, planetary assembly, beater shaft, bowl mounting area and attachment hub can collect flour and food residue even when the exterior looks clean.
- Reassembling damp components: Make sure the bowl, attachments and cleaned areas are completely dry before reinstalling them.
- Attempting unnecessary disassembly: Routine stand mixer maintenance should focus on accessible areas. If cleaning requires opening the motor housing or dismantling mechanical components, refer to an authorised service professional or the manufacturer's service instructions.
Avoiding these mistakes helps protect your stand mixer while making regular cleaning simpler, safer and more effective.
Stand Mixer Maintenance Tips for Bakers
A consistent maintenance routine can reduce the amount of deep cleaning your stand mixer needs and help keep it ready for everyday baking. Simple habits such as cleaning fresh spills immediately, using the correct attachments and checking commonly overlooked areas can make a significant difference over time.
Follow these practical stand mixer maintenance tips:
- Clean spills immediately: Wipe away fresh cake batter, buttercream, chocolate and other splashes before they dry onto the mixer body.
- Add dry ingredients gradually: Flour, cocoa powder and icing sugar can create fine airborne particles when added too quickly. Begin mixing at a suitable low speed and increase gradually according to your recipe and mixer instructions.
- Clean attachments after every use: Do not allow dough, batter or frosting to dry on the flat beater, dough hook or wire whisk. Prompt cleaning makes residue easier to remove.
- Inspect hidden areas regularly: Check underneath the mixer head, around the planetary assembly, beater shaft, attachment hub and bowl mounting area for ingredient buildup.
- Keep ventilation openings clear: Periodically inspect exterior vents and gently remove visible flour or dust with a clean, dry soft brush.
- Keep the mixer dry: Avoid positioning the appliance where it is regularly exposed to water or excessive moisture. Store or position it on a clean, stable and dry countertop.
- Use the correct attachment and speed: Follow the manufacturer's recommendations for attachments, operating speeds and maximum quantities, particularly when mixing dense bread and cookie dough.
- Inspect the power cord periodically: Check for visible damage, excessive bending or wear before reconnecting the appliance.
- Follow manufacturer care instructions: Different stand mixer models, bowls and attachments may require specific cleaning and maintenance methods. Always prioritise the instructions supplied with your appliance.
Combining these habits with regular stand mixer cleaning can help prevent stubborn ingredient buildup and keep the bowl, attachments and accessible mixer surfaces clean and ready for your next baking project.
Frequently Asked Questions About Cleaning a Stand Mixer
Even with a regular cleaning routine, bakers often have questions about water, dishwasher safety, dried batter and deep cleaning. These answers cover some of the most common concerns about how to clean a stand mixer safely and effectively.
- Can I wash a stand mixer with water?
No, the main stand mixer body should never be washed, rinsed or immersed in water because it contains electrical and mechanical components. Clean accessible exterior surfaces using a soft microfiber cloth that is only slightly damp, then wipe them dry. Removable bowls and suitable attachments can be washed separately according to the manufacturer’s care instructions. - Can stand mixer attachments go in the dishwasher?
It depends on the material, coating and construction of the attachment. Some stainless steel bowls and attachments may be dishwasher safe, while certain coated, burnished or speciality attachments may require hand washing. Always check the manufacturer’s cleaning instructions before placing a flat beater, dough hook, wire whisk or other attachment in the dishwasher. - How do I remove dried batter from a stand mixer?
For dried batter on the mixer body, use a slightly damp microfiber cloth and gently soften and wipe away the residue without scraping the surface. For suitable removable bowls and attachments, warm soapy water can help soften dried batter before cleaning with a soft sponge or brush. Never soak or immerse the mixer body. - How do I clean flour from small gaps in a stand mixer?
Use a clean, dry soft detailing brush to gently loosen flour from accessible exterior seams, controls and narrow areas. Avoid pushing flour deeper into the appliance. Never insert brushes, cotton swabs or other cleaning tools deep inside ventilation openings, electrical controls, the attachment hub or internal mechanical areas. - How often should I deep clean my stand mixer?
The ideal cleaning frequency depends on how often you bake and the ingredients you use. Frequent bakers should regularly inspect the planetary assembly, beater shaft, attachment hub, controls, base and ventilation openings. Cleaning visible flour, batter, chocolate, buttercream and other residue after every use will reduce the need for intensive deep cleaning later.
A Clean Stand Mixer Makes Every Bake Better
Your stand mixer works through some of the messiest stages of baking, from whipping buttercream and mixing chocolate cake batter to kneading sticky bread dough. Giving it proper care after use keeps the bowl, attachments and accessible mixer surfaces clean and ready whenever your next recipe begins.
Knowing how to clean a stand mixer also makes it easier to notice the areas that are often forgotten. The planetary assembly, beater shaft, attachment hub, bowl mounting area and controls deserve the same attention as the more obvious bowl and attachments. The key is to use gentle cleaning methods, keep moisture away from electrical and mechanical openings and always follow the manufacturer's care instructions.
With the cleaning complete, you can return your attention to what the stand mixer was designed for: baking. Whether your next project is a loaf of bread, a celebration cake, cookies or an elaborate dessert, a properly cared for mixer gives you a clean and organised starting point.
Explore stand mixers, mixer attachments, bakeware and baking tools at Bakerykart and get your baking station ready for your next creation.
Related Blog to Follow
Are you still looking for more interesting tips and idea on baking, lovely just follow our blog.
-
14-08-2018
Bestselling Silicone Moulds in India
If you are planning to add some silicone moulds to your collection, take a look at the bestselling silicone moulds in In....
View Detail -
10-09-2023
Choosing the Right Sourdough Proofing Basket: A Baker's Guide
Discover the art of choosing the perfect sourdough proofing basket. Explore shapes, materials, and care tips to elevate ....
View Detail -

24-06-2023
Wooden Trays for Festive Hampers: Elevate Your Gifting Experience
Explore the beauty and functionality of wooden trays for festive hampers, adding an elegant touch to your gifts.....
View Detail